1 webpack的基本配置
基于webpack4
    // webpack.common.js
    const path = require('path')
    const HtmlWebpackPlugin = require('html-webpack-plugin')
    const { srcPath, distPath } = require('./paths')

    module.exports = {
        entry: path.join(srcPath, 'index'),
        module: {
            rules: [
                {
                    test: /\.js$/,
                    loader: ['babel-loader'],
                    include: srcPath,
                    exclude: /node_modules/
                },
                // {
                //     test: /\.vue$/,
                //     loader: ['vue-loader'],
                //     include: srcPath
                // },
                // {
                //     test: /\.css$/,
                //     // loader 的执行顺序是:从后往前(知识点)
                //     loader: ['style-loader', 'css-loader']
                // },
                {
                    test: /\.css$/,
                    // loader 的执行顺序是:从后往前
                    loader: ['style-loader', 'css-loader', 'postcss-loader'] // 加了 postcss
                },
                {
                    test: /\.less$/,
                    // 增加 'less-loader' ,注意顺序
                    loader: ['style-loader', 'css-loader', 'less-loader']
                }
            ]
        },
        plugins: [
            new HtmlWebpackPlugin({
                template: path.join(srcPath, 'index.html'),
                filename: 'index.html'
            })
        ]
    }
    // paths.js
    /**
     * @description 常用文件夹路径
     */

    const path = require('path')

    const srcPath = path.join(__dirname, '..', 'src')
    const distPath = path.join(__dirname, '..', 'dist')

    module.exports = {
        srcPath,
        distPath
    }
    // webpack.dev.js

    const path = require('path')
    const webpack = require('webpack')
    const webpackCommonConf = require('./webpack.common.js')
    const { smart } = require('webpack-merge')
    const { srcPath, distPath } = require('./paths')

    module.exports = smart(webpackCommonConf, {
        mode: 'development',
        module: {
            rules: [
                // 直接引入图片 url
                {
                    test: /\.(png|jpg|jpeg|gif)$/,
                    use: 'file-loader'
                }
            ]
        },
        plugins: [
            new webpack.DefinePlugin({
                // window.ENV = 'development'
                ENV: JSON.stringify('development')
            })
        ],
        devServer: {
            port: 8080,
            progress: true,  // 显示打包的进度条
            contentBase: distPath,  // 根目录
            open: true,  // 自动打开浏览器
            compress: true,  // 启动 gzip 压缩

            // 设置代理
            proxy: {
                // 将本地 /api/xxx 代理到 localhost:3000/api/xxx
                '/api': 'http://localhost:3000',

                // 将本地 /api2/xxx 代理到 localhost:3000/xxx
                '/api2': {
                    target: 'http://localhost:3000',
                    pathRewrite: {
                        '/api2': ''
                    }
                }
            }
        }
    })
    // webpack.prod.js

    const path = require('path')
    const webpack = require('webpack')
    const { CleanWebpackPlugin } = require('clean-webpack-plugin')
    const webpackCommonConf = require('./webpack.common.js')
    const { smart } = require('webpack-merge')
    const { srcPath, distPath } = require('./paths')

    module.exports = smart(webpackCommonConf, {
        mode: 'production',
        output: {
            filename: 'bundle.[contentHash:8].js',  // 打包代码时,加上 hash 戳
            path: distPath,
            // publicPath: 'http://cdn.abc.com'  // 修改所有静态文件 url 的前缀(如 cdn 域名),这里暂时用不到
        },
        module: {
            rules: [
                // 图片 - 考虑 base64 编码的情况
                {
                    test: /\.(png|jpg|jpeg|gif)$/,
                    use: {
                        loader: 'url-loader',
                        options: {
                            // 小于 5kb 的图片用 base64 格式产出
                            // 否则,依然延用 file-loader 的形式,产出 url 格式
                            limit: 5 * 1024,

                            // 打包到 img 目录下
                            outputPath: '/img1/',

                            // 设置图片的 cdn 地址(也可以统一在外面的 output 中设置,那将作用于所有静态资源)
                            // publicPath: 'http://cdn.abc.com'
                        }
                    }
                },
            ]
        },
        plugins: [
            new CleanWebpackPlugin(), // 会默认清空 output.path 文件夹
            new webpack.DefinePlugin({
                // window.ENV = 'production'
                ENV: JSON.stringify('production')
            })
        ]
    })
2 webpack高级配置
配置多入口打包
    // paths.js
    /**
     * @description 常用文件夹路径
     */

    const path = require('path')

    const srcPath = path.join(__dirname, '..', 'src')
    const distPath = path.join(__dirname, '..', 'dist')

    module.exports = {
        srcPath,
        distPath
    }
    // webpack.common.js
    const path = require('path')
    const HtmlWebpackPlugin = require('html-webpack-plugin')
    const { srcPath, distPath } = require('./paths')

    module.exports = {
        entry: { // 多入口
            index: path.join(srcPath, 'index.js'),
            other: path.join(srcPath, 'other.js')
        },
        module: {
            rules: [
                {
                    test: /\.js$/,
                    loader: ['babel-loader'],
                    include: srcPath,
                    exclude: /node_modules/
                },
                // {
                //     test: /\.css$/,
                //     // loader 的执行顺序是:从后往前
                //     loader: ['style-loader', 'css-loader']
                // },
                {
                    test: /\.css$/,
                    // loader 的执行顺序是:从后往前
                    loader: ['style-loader', 'css-loader', 'postcss-loader'] // 加了 postcss
                },
                {
                    test: /\.less$/,
                    // 增加 'less-loader' ,注意顺序
                    loader: ['style-loader', 'css-loader', 'less-loader']
                }
            ]
        },
        plugins: [
            // new HtmlWebpackPlugin({
            //     template: path.join(srcPath, 'index.html'),
            //     filename: 'index.html'
            // })

            // 多入口 - 生成 index.html
            new HtmlWebpackPlugin({
                template: path.join(srcPath, 'index.html'),
                filename: 'index.html',
                // chunks 表示该页面要引用哪些 chunk (即上面的 index 和 other),默认全部引用
                chunks: ['index']  // 只引用 index.js
            }),
            // 多入口 - 生成 other.html
            new HtmlWebpackPlugin({
                template: path.join(srcPath, 'other.html'),
                filename: 'other.html',
                chunks: ['other']  // 只引用 other.js
            })
        ]
    }
    // webpack.dev.js

    const path = require('path')
    const webpack = require('webpack')
    const webpackCommonConf = require('./webpack.common.js')
    const { smart } = require('webpack-merge')
    const { srcPath, distPath } = require('./paths')

    module.exports = smart(webpackCommonConf, {
        mode: 'development',
        module: {
            rules: [
                // 直接引入图片 url
                {
                    test: /\.(png|jpg|jpeg|gif)$/,
                    use: 'file-loader'
                }
            ]
        },
        plugins: [
            new webpack.DefinePlugin({
                // window.ENV = 'production'
                ENV: JSON.stringify('development')
            })
        ],
        devServer: {
            port: 8080,
            progress: true,  // 显示打包的进度条
            contentBase: distPath,  // 根目录
            open: true,  // 自动打开浏览器
            compress: true,  // 启动 gzip 压缩

            // 设置代理
            proxy: {
                // 将本地 /api/xxx 代理到 localhost:3000/api/xxx
                '/api': 'http://localhost:3000',

                // 将本地 /api2/xxx 代理到 localhost:3000/xxx
                '/api2': {
                    target: 'http://localhost:3000',
                    pathRewrite: {
                        '/api2': ''
                    }
                }
            }
        }
    })
    // webpack.prod.js

    const path = require('path')
    const webpack = require('webpack')
    const { CleanWebpackPlugin } = require('clean-webpack-plugin')
    const webpackCommonConf = require('./webpack.common.js')
    const { smart } = require('webpack-merge')
    const { srcPath, distPath } = require('./paths')

    module.exports = smart(webpackCommonConf, {
        mode: 'production',
        output: {
            // filename: 'bundle.[contentHash:8].js',  // 打包代码时,加上 hash 戳
            filename: '[name].[contentHash:8].js', // name 即多入口时 entry 的 key
            path: distPath,
            // publicPath: 'http://cdn.abc.com'  // 修改所有静态文件 url 的前缀(如 cdn 域名),这里暂时用不到
        },
        module: {
            rules: [
                // 图片 - 考虑 base64 编码的情况
                {
                    test: /\.(png|jpg|jpeg|gif)$/,
                    use: {
                        loader: 'url-loader',
                        options: {
                            // 小于 5kb 的图片用 base64 格式产出
                            // 否则,依然延用 file-loader 的形式,产出 url 格式
                            limit: 5 * 1024,

                            // 打包到 img 目录下
                            outputPath: '/img1/',

                            // 设置图片的 cdn 地址(也可以统一在外面的 output 中设置,那将作用于所有静态资源)
                            // publicPath: 'http://cdn.abc.com'
                        }
                    }
                },
            ]
        },
        plugins: [
            new CleanWebpackPlugin(), // 会默认清空 output.path 文件夹
            new webpack.DefinePlugin({
                // window.ENV = 'production'
                ENV: JSON.stringify('production')
            })
        ]
    })
抽离CSS文件
    const path = require('path')
    const webpack = require('webpack')
    const { smart } = require('webpack-merge')
    const { CleanWebpackPlugin } = require('clean-webpack-plugin')
    const MiniCssExtractPlugin = require('mini-css-extract-plugin')
    const TerserJSPlugin = require('terser-webpack-plugin')
    const OptimizeCSSAssetsPlugin = require('optimize-css-assets-webpack-plugin')
    const webpackCommonConf = require('./webpack.common.js')
    const { srcPath, distPath } = require('./paths')

    module.exports = smart(webpackCommonConf, {
        mode: 'production',
        output: {
            // filename: 'bundle.[contentHash:8].js',  // 打包代码时,加上 hash 戳
            filename: '[name].[contentHash:8].js', // name 即多入口时 entry 的 key
            path: distPath,
            // publicPath: 'http://cdn.abc.com'  // 修改所有静态文件 url 的前缀(如 cdn 域名),这里暂时用不到
        },
        module: {
            rules: [
                // 图片 - 考虑 base64 编码的情况
                {
                    test: /\.(png|jpg|jpeg|gif)$/,
                    use: {
                        loader: 'url-loader',
                        options: {
                            // 小于 5kb 的图片用 base64 格式产出
                            // 否则,依然延用 file-loader 的形式,产出 url 格式
                            limit: 5 * 1024,

                            // 打包到 img 目录下
                            outputPath: '/img1/',

                            // 设置图片的 cdn 地址(也可以统一在外面的 output 中设置,那将作用于所有静态资源)
                            // publicPath: 'http://cdn.abc.com'
                        }
                    }
                },
                // 抽离 css
                {
                    test: /\.css$/,
                    loader: [
                        MiniCssExtractPlugin.loader,  // 注意,这里不再用 style-loader
                        'css-loader',
                        'postcss-loader'
                    ]
                },
                // 抽离 less --> css
                {
                    test: /\.less$/,
                    loader: [
                        MiniCssExtractPlugin.loader,  // 注意,这里不再用 style-loader
                        'css-loader',
                        'less-loader',
                        'postcss-loader'
                    ]
                }
            ]
        },
        plugins: [
            new CleanWebpackPlugin(), // 会默认清空 output.path 文件夹
            new webpack.DefinePlugin({
                // window.ENV = 'production'
                ENV: JSON.stringify('production')
            }),

            // 抽离 css 文件
            new MiniCssExtractPlugin({
                filename: 'css/main.[contentHash:8].css'
            })
        ],

        optimization: {
            // 压缩 css
            minimizer: [new TerserJSPlugin({}), new OptimizeCSSAssetsPlugin({})],
        }
    })
抽离公共代码splitChunks,避免多次打包
    // webpack.prod.js
    const path = require('path')
    const webpack = require('webpack')
    const { smart } = require('webpack-merge')
    const { CleanWebpackPlugin } = require('clean-webpack-plugin')
    const MiniCssExtractPlugin = require('mini-css-extract-plugin')
    const TerserJSPlugin = require('terser-webpack-plugin')
    const OptimizeCSSAssetsPlugin = require('optimize-css-assets-webpack-plugin')
    const webpackCommonConf = require('./webpack.common.js')
    const { srcPath, distPath } = require('./paths')

    module.exports = smart(webpackCommonConf, {
        mode: 'production',
        output: {
            // filename: 'bundle.[contentHash:8].js',  // 打包代码时,加上 hash 戳
            filename: '[name].[contentHash:8].js', // name 即多入口时 entry 的 key
            path: distPath,
            // publicPath: 'http://cdn.abc.com'  // 修改所有静态文件 url 的前缀(如 cdn 域名),这里暂时用不到
        },
        module: {
            rules: [
                // 图片 - 考虑 base64 编码的情况
                {
                    test: /\.(png|jpg|jpeg|gif)$/,
                    use: {
                        loader: 'url-loader',
                        options: {
                            // 小于 5kb 的图片用 base64 格式产出
                            // 否则,依然延用 file-loader 的形式,产出 url 格式
                            limit: 5 * 1024,

                            // 打包到 img 目录下
                            outputPath: '/img1/',

                            // 设置图片的 cdn 地址(也可以统一在外面的 output 中设置,那将作用于所有静态资源)
                            // publicPath: 'http://cdn.abc.com'
                        }
                    }
                },
                // 抽离 css
                {
                    test: /\.css$/,
                    loader: [
                        MiniCssExtractPlugin.loader,  // 注意,这里不再用 style-loader
                        'css-loader',
                        'postcss-loader'
                    ]
                },
                // 抽离 less
                {
                    test: /\.less$/,
                    loader: [
                        MiniCssExtractPlugin.loader,  // 注意,这里不再用 style-loader
                        'css-loader',
                        'less-loader',
                        'postcss-loader'
                    ]
                }
            ]
        },
        plugins: [
            new CleanWebpackPlugin(), // 会默认清空 output.path 文件夹
            new webpack.DefinePlugin({
                // window.ENV = 'production'
                ENV: JSON.stringify('production')
            }),

            // 抽离 css 文件
            new MiniCssExtractPlugin({
                filename: 'css/main.[contentHash:8].css'
            })
        ],

        optimization: {
            // 压缩 css
            minimizer: [new TerserJSPlugin({}), new OptimizeCSSAssetsPlugin({})],

            // 分割代码块
            splitChunks: {
                chunks: 'all',
                /**
                 * initial 入口 chunk,对于异步导入的文件不处理
                    async 异步 chunk,只对异步导入的文件处理
                    all 全部 chunk
                 */

                // 缓存分组
                cacheGroups: {
                    // 第三方模块
                    vendor: {
                        name: 'vendor', // chunk 名称
                        priority: 1, // 权限更高,优先抽离,重要!!!
                        test: /node_modules/,
                        minSize: 0,  // 大小限制,如3kb
                        minChunks: 1  // 最少复用过几次
                    },

                    // 公共的模块
                    common: {
                        name: 'common', // chunk 名称
                        priority: 0, // 优先级
                        minSize: 0,  // 公共模块的大小限制
                        minChunks: 2  // 公共模块最少复用过几次
                    }
                }
            }
        }
    })
3 webpack性能优化-构建速度
先分析遇到哪些问题,在配合下面的方法优化,不要上来就回答,让人觉得背面试题
- 优化
babel-loader缓存 IgnorePlugin忽略某些包,避免引入无用模块(直接不引入,需要在代码中引入)noParse避免重复打包(引入但不打包)happyPack多线程打包- JS单线程的,开启多进程打包
- 提高构建速度(特别是多核
CPU)
parallelUglifyPlugin多进程压缩JS- 关于多进程
- 项目较大,打包较慢,开启多进程能提高速度
- 项目较小,打包很快,开启多进程反而会降低速度(进程开销)
- 按需使用
- 关于多进程
- 自动刷新(开发环境)
- 热更新(开发环境)
- 自动刷新:整个网页全部刷新,速度较慢,状态会丢失
- 热更新:新代码生效,网页不刷新,状态不丢失
DllPlugin动态链接库(dllPlugin只适用于开发环境,因为生产环境下打包一次就完了,没有必要用于生产环境)- 前端框架如
react、vue体积大,构建慢 - 较稳定,不常升级版本,同一个版本只构建一次,不用每次都重新构建
webpack已内置DllPlugin,不需要安装DllPlugin打包出dll文件DllReferencePlugin引用dll文件
- 前端框架如
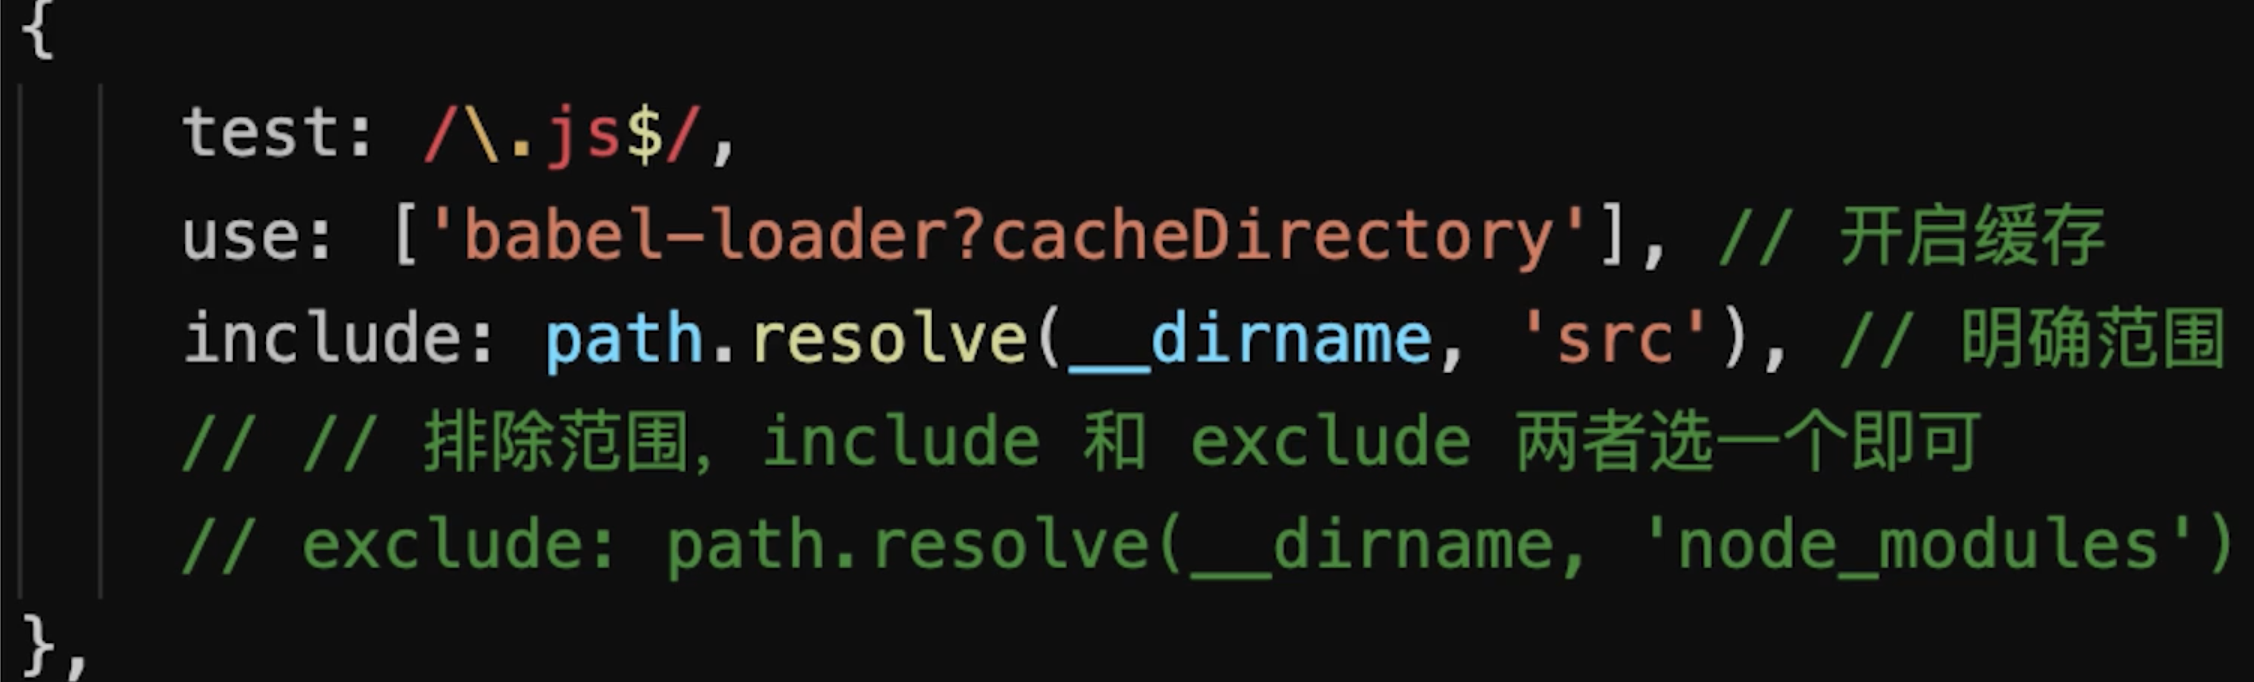
优化babel-loader
IgnorePlugin
import moment from 'moment'- 默认会引入所有语言JS代码,代码过大
    import moment from 'moment'
    moment.locale('zh-cn') // 设置语言为中文

    // 手动引入中文语言包
    import 'moment/locale/zh-cn'
    // webpack.prod.js
    pluins: [
        // 忽略 moment 下的 /locale 目录
        new webpack.IgnorePlugin(/\.\/locale/, /moment/),
    ]
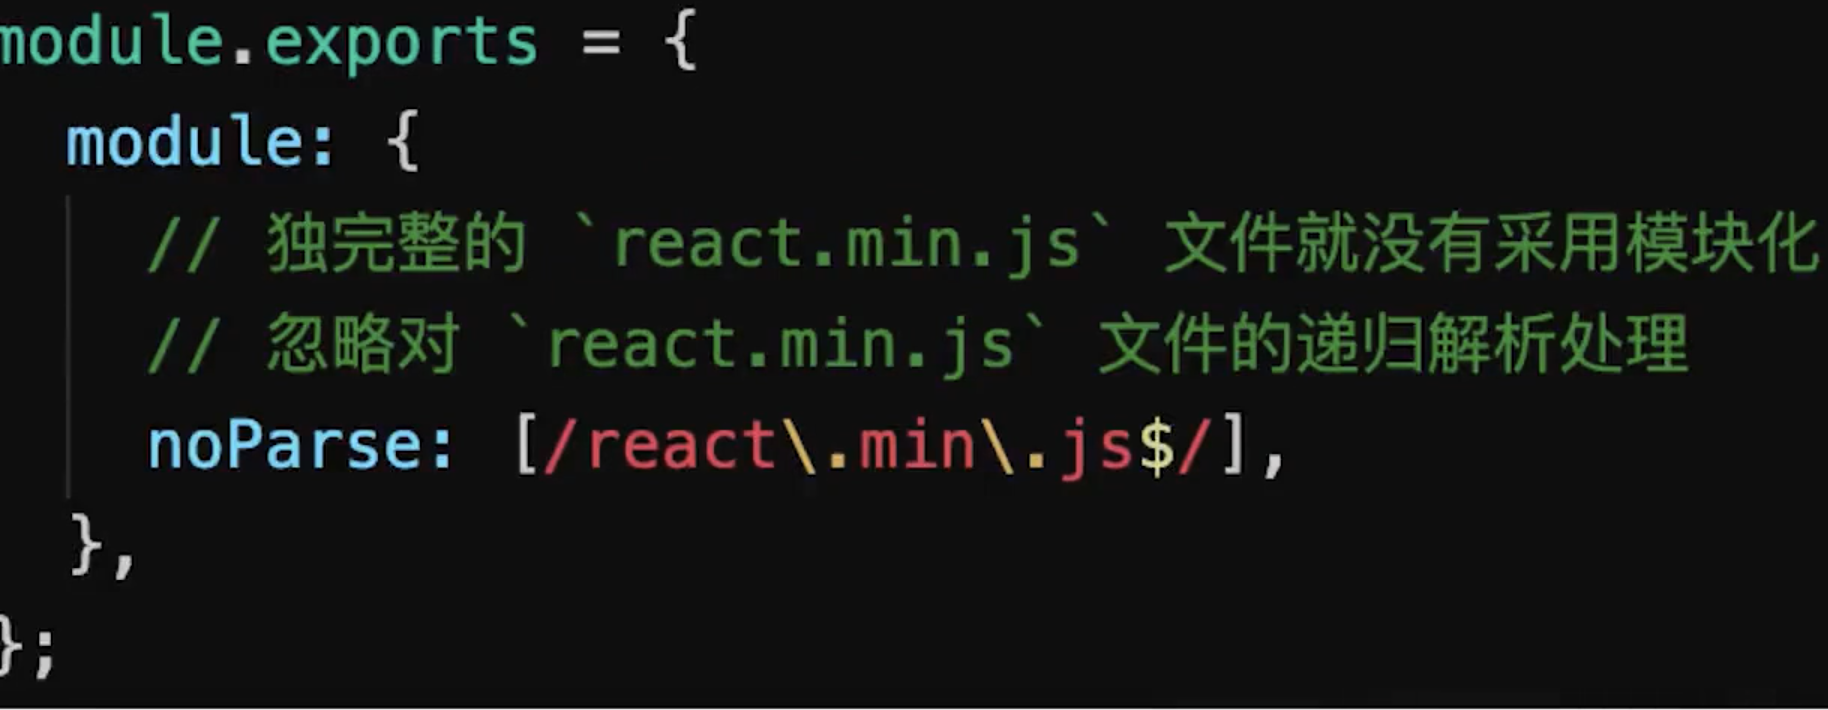
noParse
happyPack
    // webpack.prod.js
    const HappyPack = require('happypack')

    {
        module: {
            rules: [
                // js
                {
                    test: /\.js$/,
                    // 把对 .js 文件的处理转交给 id 为 babel 的 HappyPack 实例
                    use: ['happypack/loader?id=babel'],
                    include: srcPath,
                    // exclude: /node_modules/
                },
            ]
        },
        plugins: [
            // happyPack 开启多进程打包
            new HappyPack({
                // 用唯一的标识符 id 来代表当前的 HappyPack 是用来处理一类特定的文件
                id: 'babel',
                // 如何处理 .js 文件,用法和 Loader 配置中一样
                loaders: ['babel-loader?cacheDirectory']
            }),
        ]
    }
parallelUglifyPlugin
    // webpack.prod.js
    const ParallelUglifyPlugin = require('webpack-parallel-uglify-plugin')

    {
        plugins: [
            // 使用 ParallelUglifyPlugin 并行压缩输出的 JS 代码
            new ParallelUglifyPlugin({
                // 传递给 UglifyJS 的参数
                // (还是使用 UglifyJS 压缩,只不过帮助开启了多进程)
                uglifyJS: {
                    output: {
                        beautify: false, // 最紧凑的输出
                        comments: false, // 删除所有的注释
                    },
                    compress: {
                        // 删除所有的 `console` 语句,可以兼容ie浏览器
                        drop_console: true,
                        // 内嵌定义了但是只用到一次的变量
                        collapse_vars: true,
                        // 提取出出现多次但是没有定义成变量去引用的静态值
                        reduce_vars: true,
                    }
                }
            })
        ]
    }
自动刷新
使用
dev-server即可
热更新
    // webpack.dev.js
    const HotModuleReplacementPlugin = require('webpack/lib/HotModuleReplacementPlugin');

    entry: {
        // index: path.join(srcPath, 'index.js'),
        index: [
            'webpack-dev-server/client?http://localhost:8080/',
            'webpack/hot/dev-server',
            path.join(srcPath, 'index.js')
        ],
        other: path.join(srcPath, 'other.js')
    },
    devServer: {
        hot: true
    },
    plugins: [
        new HotModuleReplacementPlugin()
    ],
    // 代码中index.js

    // 增加,开启热更新之后的代码逻辑
    if (module.hot) {
        // 注册哪些模块需要热更新
        module.hot.accept(['./math'], () => {
            const sumRes = sum(10, 30)
            console.log('sumRes in hot', sumRes)
        })
    }
优化打包速度完整代码
    // webpack.common.js

    const path = require('path')
    const HtmlWebpackPlugin = require('html-webpack-plugin')
    const { srcPath, distPath } = require('./paths')

    module.exports = {
        entry: {
            index: path.join(srcPath, 'index.js'),
            other: path.join(srcPath, 'other.js')
        },
        module: {
            rules: [
                // babel-loader
            ]
        },
        plugins: [
            // new HtmlWebpackPlugin({
            //     template: path.join(srcPath, 'index.html'),
            //     filename: 'index.html'
            // })

            // 多入口 - 生成 index.html
            new HtmlWebpackPlugin({
                template: path.join(srcPath, 'index.html'),
                filename: 'index.html',
                // chunks 表示该页面要引用哪些 chunk (即上面的 index 和 other),默认全部引用
                chunks: ['index', 'vendor', 'common']  // 要考虑代码分割
            }),
            // 多入口 - 生成 other.html
            new HtmlWebpackPlugin({
                template: path.join(srcPath, 'other.html'),
                filename: 'other.html',
                chunks: ['other', 'vendor', 'common']  // 考虑代码分割
            })
        ]
    }
// webpack.dev.js
const path = require('path')
const webpack = require('webpack')
const webpackCommonConf = require('./webpack.common.js')
const { smart } = require('webpack-merge')
const { srcPath, distPath } = require('./paths')
const HotModuleReplacementPlugin = require('webpack/lib/HotModuleReplacementPlugin');
module.exports = smart(webpackCommonConf, {
mode: 'development',
entry: {
// index: path.join(srcPath, 'index.js'),
index: [
'webpack-dev-server/client?http://localhost:8080/',
'webpack/hot/dev-server',
path.join(srcPath, 'index.js')
],
other: path.join(srcPath, 'other.js')
},
module: {
rules: [
{
test: /\.js$/,
loader: ['babel-loader?cacheDirectory'],
include: srcPath,
// exclude: /node_modules/
},
// 直接引入图片 url
{
test: /\.(png|jpg|jpeg|gif)$/,
use: 'file-loader'
},
// {
// test: /\.css$/,
// // loader 的执行顺序是:从后往前
// loader: ['style-loader', 'css-loader']
// },
{
test: /\.css$/,
// loader 的执行顺序是:从后往前
loader: ['style-loader', 'css-loader', 'postcss-loader'] // 加了 postcss
},
{
test: /\.less$/,
// 增加 'less-loader' ,注意顺序
loader: ['style-loader', 'css-loader', 'less-loader']
}
]
},
plugins: [
new webpack.DefinePlugin({
// window.ENV = 'production'
ENV: JSON.stringify('development')
}),
new HotModuleReplacementPlugin()
],
devServer: {
port: 8080,
progress: true, // 显示打包的进度条
contentBase: distPath, // 根目录
open: true, // 自动打开浏览器
compress: true, // 启动 gzip 压缩
hot: true,
// 设置代理
proxy: {
// 将本地 /api/xxx 代理到 localhost:3000/api/xxx
'/api': 'http://localhost:3000',
// 将本地 /api2/xxx 代理到 localhost:3000/xxx
'/api2': {
target: 'http://localhost:3000',
pathRewrite: {
'/api2': ''
}
}
}
},
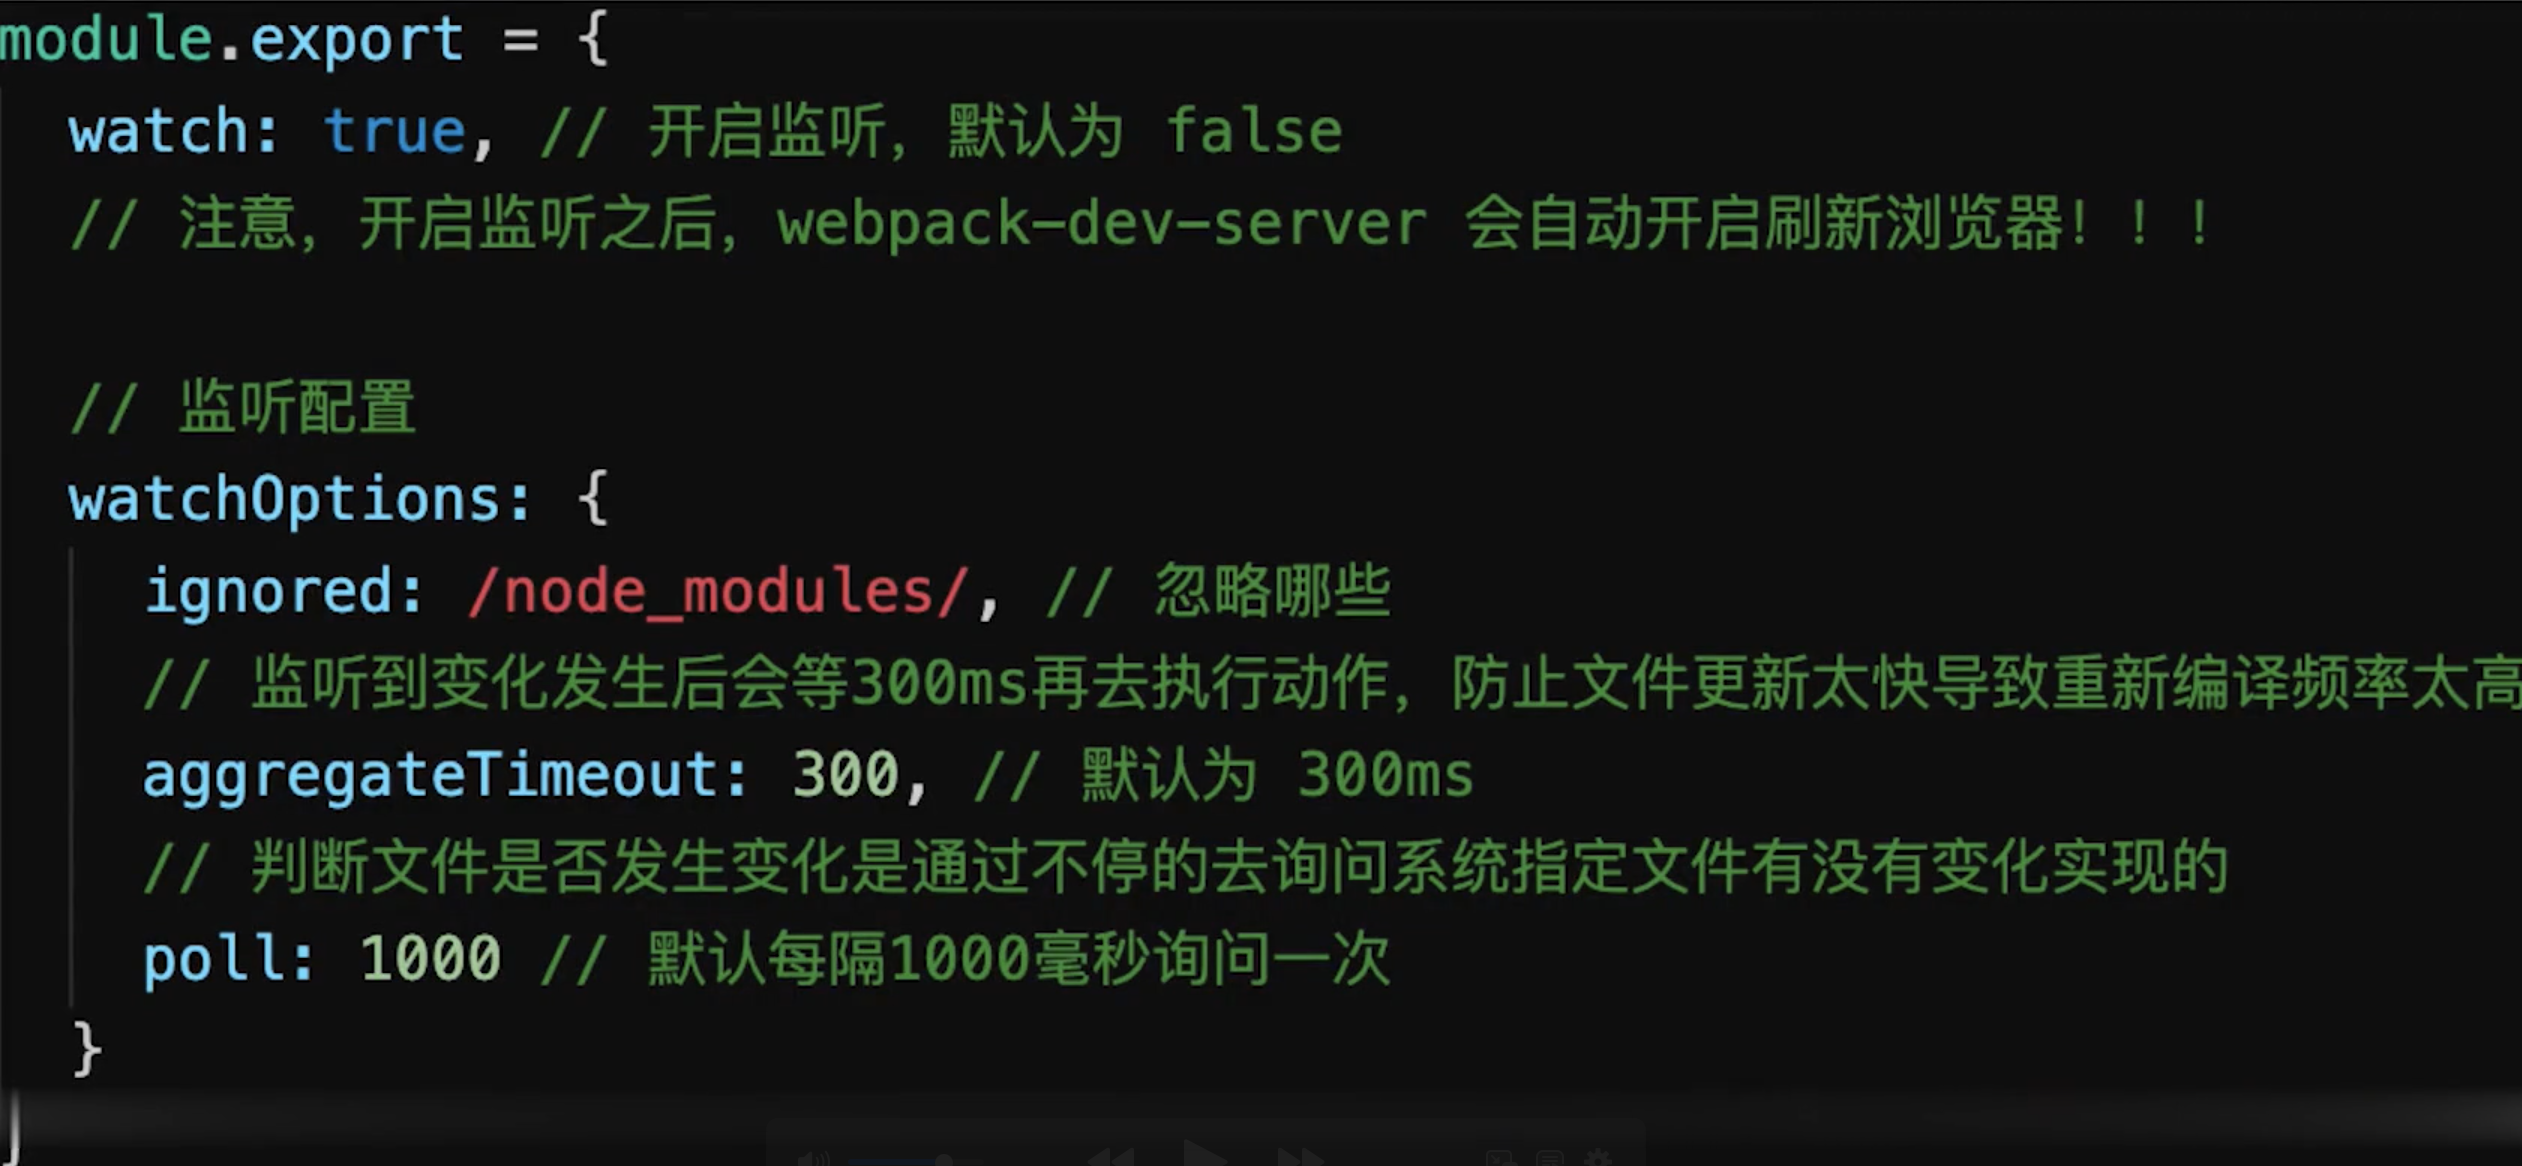
// watch: true, // 开启监听,默认为 false
// watchOptions: {
// ignored: /node_modules/, // 忽略哪些
// // 监听到变化发生后会等300ms再去执行动作,防止文件更新太快导致重新编译频率太高
// // 默认为 300ms
// aggregateTimeout: 300,
// // 判断文件是否发生变化是通过不停的去询问系统指定文件有没有变化实现的
// // 默认每隔1000毫秒询问一次
// poll: 1000
// }
})
    // webpack.prod.js
    const path = require('path')
    const webpack = require('webpack')
    const { smart } = require('webpack-merge')
    const { CleanWebpackPlugin } = require('clean-webpack-plugin')
    const MiniCssExtractPlugin = require('mini-css-extract-plugin')
    const TerserJSPlugin = require('terser-webpack-plugin')
    const OptimizeCSSAssetsPlugin = require('optimize-css-assets-webpack-plugin')
    const HappyPack = require('happypack')
    const ParallelUglifyPlugin = require('webpack-parallel-uglify-plugin')
    const webpackCommonConf = require('./webpack.common.js')
    const { srcPath, distPath } = require('./paths')

    module.exports = smart(webpackCommonConf, {
        mode: 'production',
        output: {
            // filename: 'bundle.[contentHash:8].js',  // 打包代码时,加上 hash 戳
            filename: '[name].[contentHash:8].js', // name 即多入口时 entry 的 key
            path: distPath,
            // publicPath: 'http://cdn.abc.com'  // 修改所有静态文件 url 的前缀(如 cdn 域名),这里暂时用不到
        },
        module: {
            rules: [
                // js
                {
                    test: /\.js$/,
                    // 把对 .js 文件的处理转交给 id 为 babel 的 HappyPack 实例
                    use: ['happypack/loader?id=babel'],
                    include: srcPath,
                    // exclude: /node_modules/
                },
                // 图片 - 考虑 base64 编码的情况
                {
                    test: /\.(png|jpg|jpeg|gif)$/,
                    use: {
                        loader: 'url-loader',
                        options: {
                            // 小于 5kb 的图片用 base64 格式产出
                            // 否则,依然延用 file-loader 的形式,产出 url 格式
                            limit: 5 * 1024,

                            // 打包到 img 目录下
                            outputPath: '/img1/',

                            // 设置图片的 cdn 地址(也可以统一在外面的 output 中设置,那将作用于所有静态资源)
                            // publicPath: 'http://cdn.abc.com'
                        }
                    }
                },
                // 抽离 css
                {
                    test: /\.css$/,
                    loader: [
                        MiniCssExtractPlugin.loader,  // 注意,这里不再用 style-loader
                        'css-loader',
                        'postcss-loader'
                    ]
                },
                // 抽离 less
                {
                    test: /\.less$/,
                    loader: [
                        MiniCssExtractPlugin.loader,  // 注意,这里不再用 style-loader
                        'css-loader',
                        'less-loader',
                        'postcss-loader'
                    ]
                }
            ]
        },
        plugins: [
            new CleanWebpackPlugin(), // 会默认清空 output.path 文件夹
            new webpack.DefinePlugin({
                // window.ENV = 'production'
                ENV: JSON.stringify('production')
            }),

            // 抽离 css 文件
            new MiniCssExtractPlugin({
                filename: 'css/main.[contentHash:8].css'
            }),

            // 忽略 moment 下的 /locale 目录
            new webpack.IgnorePlugin(/\.\/locale/, /moment/),

            // happyPack 开启多进程打包
            new HappyPack({
                // 用唯一的标识符 id 来代表当前的 HappyPack 是用来处理一类特定的文件
                id: 'babel',
                // 如何处理 .js 文件,用法和 Loader 配置中一样
                loaders: ['babel-loader?cacheDirectory']
            }),

            // 使用 ParallelUglifyPlugin 并行压缩输出的 JS 代码
            new ParallelUglifyPlugin({
                // 传递给 UglifyJS 的参数
                // (还是使用 UglifyJS 压缩,只不过帮助开启了多进程)
                uglifyJS: {
                    output: {
                        beautify: false, // 最紧凑的输出
                        comments: false, // 删除所有的注释
                    },
                    compress: {
                        // 删除所有的 `console` 语句,可以兼容ie浏览器
                        drop_console: true,
                        // 内嵌定义了但是只用到一次的变量
                        collapse_vars: true,
                        // 提取出出现多次但是没有定义成变量去引用的静态值
                        reduce_vars: true,
                    }
                }
            })
        ],

        optimization: {
            // 压缩 css
            minimizer: [new TerserJSPlugin({}), new OptimizeCSSAssetsPlugin({})],

            // 分割代码块
            splitChunks: {
                chunks: 'all',
                /**
                 * initial 入口chunk,对于异步导入的文件不处理
                    async 异步chunk,只对异步导入的文件处理
                    all 全部chunk
                 */

                // 缓存分组
                cacheGroups: {
                    // 第三方模块
                    vendor: {
                        name: 'vendor', // chunk 名称
                        priority: 1, // 权限更高,优先抽离,重要!!!
                        test: /node_modules/,
                        minSize: 0,  // 大小限制
                        minChunks: 1  // 最少复用过几次
                    },

                    // 公共的模块
                    common: {
                        name: 'common', // chunk 名称
                        priority: 0, // 优先级
                        minSize: 0,  // 公共模块的大小限制
                        minChunks: 2  // 公共模块最少复用过几次
                    }
                }
            }
        }
    })
DllPlugin 动态链接库
    // webpack.common.js
    const path = require('path')
    const HtmlWebpackPlugin = require('html-webpack-plugin')
    const { srcPath, distPath } = require('./paths')

    module.exports = {
        entry: path.join(srcPath, 'index'),
        module: {
            rules: [
                {
                    test: /\.js$/,
                    use: ['babel-loader'],
                    include: srcPath,
                    exclude: /node_modules/
                },
            ]
        },
        plugins: [
            new HtmlWebpackPlugin({
                template: path.join(srcPath, 'index.html'),
                filename: 'index.html'
            })
        ]
    }
    // webpack.dev.js
    const path = require('path')
    const webpack = require('webpack')
    const { merge } = require('webpack-merge')
    const webpackCommonConf = require('./webpack.common.js')
    const { srcPath, distPath } = require('./paths')

    // 第一,引入 DllReferencePlugin
    const DllReferencePlugin = require('webpack/lib/DllReferencePlugin');

    module.exports = merge(webpackCommonConf, {
        mode: 'development',
        module: {
            rules: [
                {
                    test: /\.js$/,
                    use: ['babel-loader'],
                    include: srcPath,
                    exclude: /node_modules/ // 第二,不要再转换 node_modules 的代码
                },
            ]
        },
        plugins: [
            new webpack.DefinePlugin({
                // window.ENV = 'production'
                ENV: JSON.stringify('development')
            }),
            // 第三,告诉 Webpack 使用了哪些动态链接库
            new DllReferencePlugin({
                // 描述 react 动态链接库的文件内容
                manifest: require(path.join(distPath, 'react.manifest.json')),
            }),
        ],
        devServer: {
            port: 8080,
            progress: true,  // 显示打包的进度条
            contentBase: distPath,  // 根目录
            open: true,  // 自动打开浏览器
            compress: true,  // 启动 gzip 压缩

            // 设置代理
            proxy: {
                // 将本地 /api/xxx 代理到 localhost:3000/api/xxx
                '/api': 'http://localhost:3000',

                // 将本地 /api2/xxx 代理到 localhost:3000/xxx
                '/api2': {
                    target: 'http://localhost:3000',
                    pathRewrite: {
                        '/api2': ''
                    }
                }
            }
        }
    })
    // webpack.prod.js
    const path = require('path')
    const webpack = require('webpack')
    const webpackCommonConf = require('./webpack.common.js')
    const { merge } = require('webpack-merge')
    const { srcPath, distPath } = require('./paths')

    module.exports = merge(webpackCommonConf, {
        mode: 'production',
        output: {
            filename: 'bundle.[contenthash:8].js',  // 打包代码时,加上 hash 戳
            path: distPath,
            // publicPath: 'http://cdn.abc.com'  // 修改所有静态文件 url 的前缀(如 cdn 域名),这里暂时用不到
        },
        plugins: [
            new webpack.DefinePlugin({
                // window.ENV = 'production'
                ENV: JSON.stringify('production')
            })
        ]
    })
    // webpack.dll.js

    const path = require('path')
    const DllPlugin = require('webpack/lib/DllPlugin')
    const { srcPath, distPath } = require('./paths')

    module.exports = {
      mode: 'development',
      // JS 执行入口文件
      entry: {
        // 把 React 相关模块的放到一个单独的动态链接库
        react: ['react', 'react-dom']
      },
      output: {
        // 输出的动态链接库的文件名称,[name] 代表当前动态链接库的名称,
        // 也就是 entry 中配置的 react 和 polyfill
        filename: '[name].dll.js',
        // 输出的文件都放到 dist 目录下
        path: distPath,
        // 存放动态链接库的全局变量名称,例如对应 react 来说就是 _dll_react
        // 之所以在前面加上 _dll_ 是为了防止全局变量冲突
        library: '_dll_[name]',
      },
      plugins: [
        // 接入 DllPlugin
        new DllPlugin({
          // 动态链接库的全局变量名称,需要和 output.library 中保持一致
          // 该字段的值也就是输出的 manifest.json 文件 中 name 字段的值
          // 例如 react.manifest.json 中就有 "name": "_dll_react"
          name: '_dll_[name]',
          // 描述动态链接库的 manifest.json 文件输出时的文件名称
          path: path.join(distPath, '[name].manifest.json'),
        }),
      ],
    }
      "scripts": {
        "dev": "webpack serve --config build/webpack.dev.js",
        "dll": "webpack --config build/webpack.dll.js"
      },
4 webpack性能优化-产出代码(线上运行)
前言
- 体积更小
- 合理分包,不重复加载
- 速度更快、内存使用更少
产出代码优化
- 小图片
base64编码,减少http请求
        // 图片 - 考虑 base64 编码的情况
    module: {
        rules: [
            {
                test: /\.(png|jpg|jpeg|gif)$/,
                use: {
                    loader: 'url-loader',
                    options: {
                        // 小于 5kb 的图片用 base64 格式产出
                        // 否则,依然延用 file-loader 的形式,产出 url 格式
                        limit: 5 * 1024,

                        // 打包到 img 目录下
                        outputPath: '/img1/',

                        // 设置图片的 cdn 地址(也可以统一在外面的 output 中设置,那将作用于所有静态资源)
                        // publicPath: 'http://cdn.abc.com'
                    }
                }
            },
        ]
    }
bundle加contenthash,有利于浏览器缓存- 懒加载
import()语法,减少首屏加载时间 - 提取公共代码(第三方代码
Vue、React、loadash等)没有必要多次打包,可以提取到vendor中 IgnorePlugin忽略不需要的包(如moment多语言),减少打包的代码- 使用
CDN加速,减少资源加载时间
        output: {
      filename: '[name].[contentHash:8].js', // name 即多入口时 entry 的 key
      path: path.join(__dirname, '..', 'dist'),
      // 修改所有静态文件 url 的前缀(如 cdn 域名)
      // 这样index.html中引入的js、css、图片等资源都会加上这个前缀
      publicPath: 'http://cdn.abc.com'
    },
webpack使用production模式,mode: 'production'- 自动压缩代码
- 启动
Tree ShakingES6模块化,import和export,webpack会自动识别,才会生效Commonjs模块化,require和module.exports,webpack无法识别,不会生效- ES6模块和Commonjs模块区别
ES6模块是静态引入,编译时引入Commonjs是动态引入,执行时引入- 只有
ES6 Module才能静态分析,实现Tree Shaking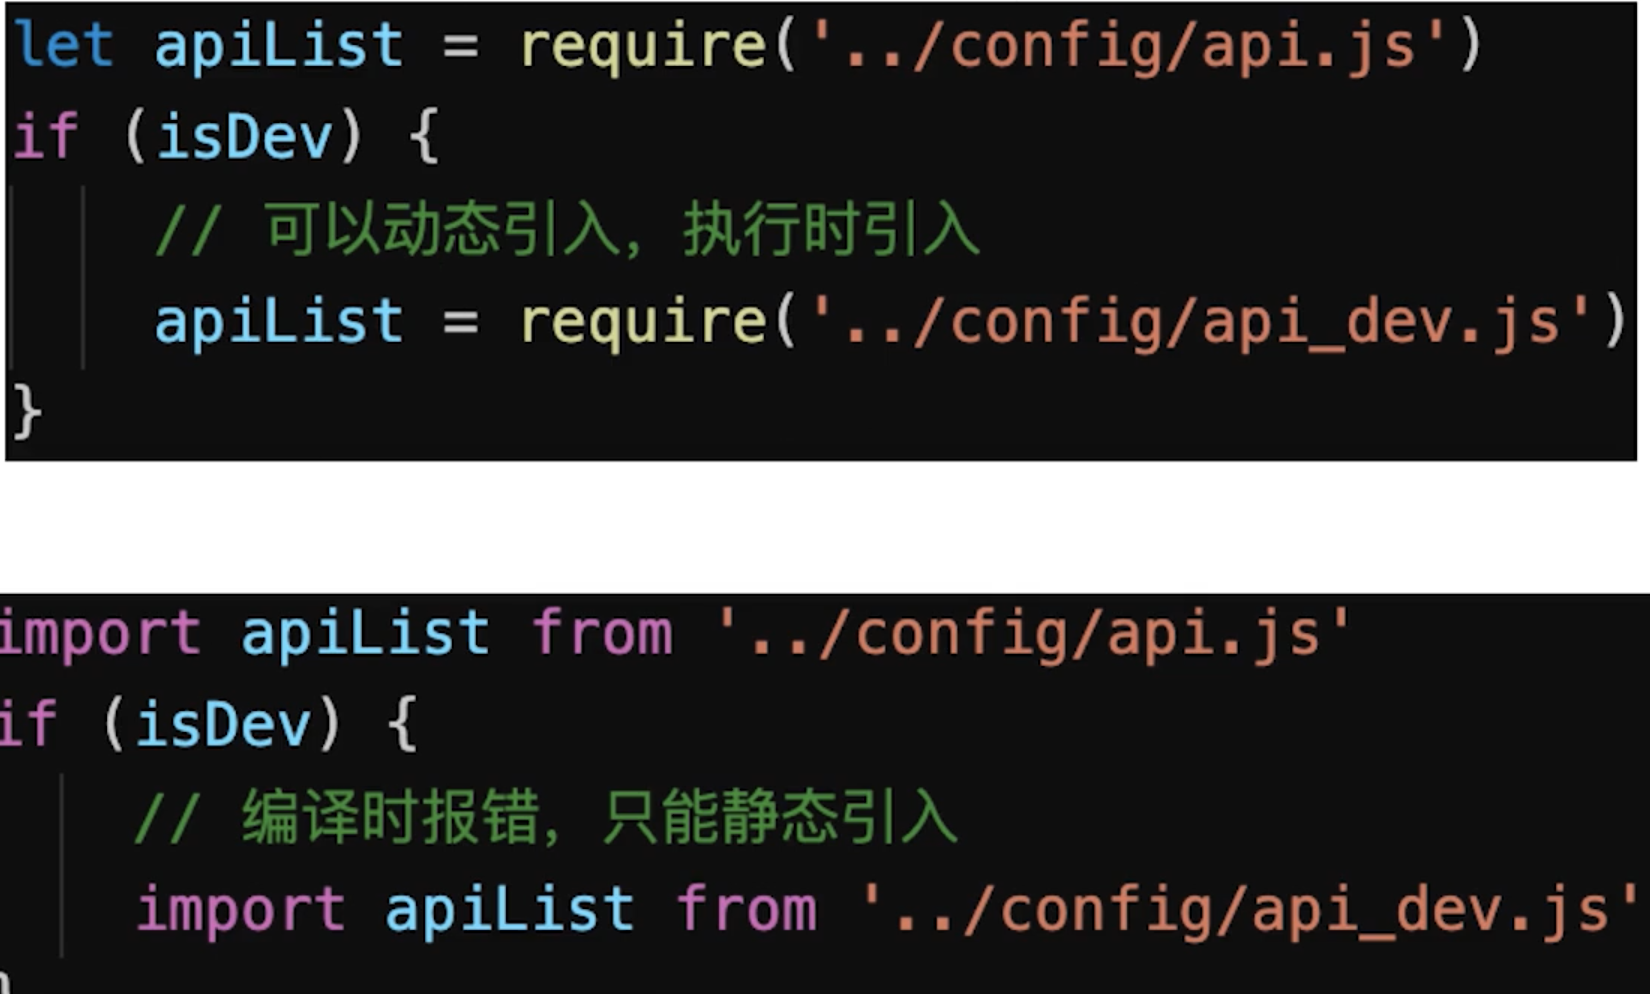
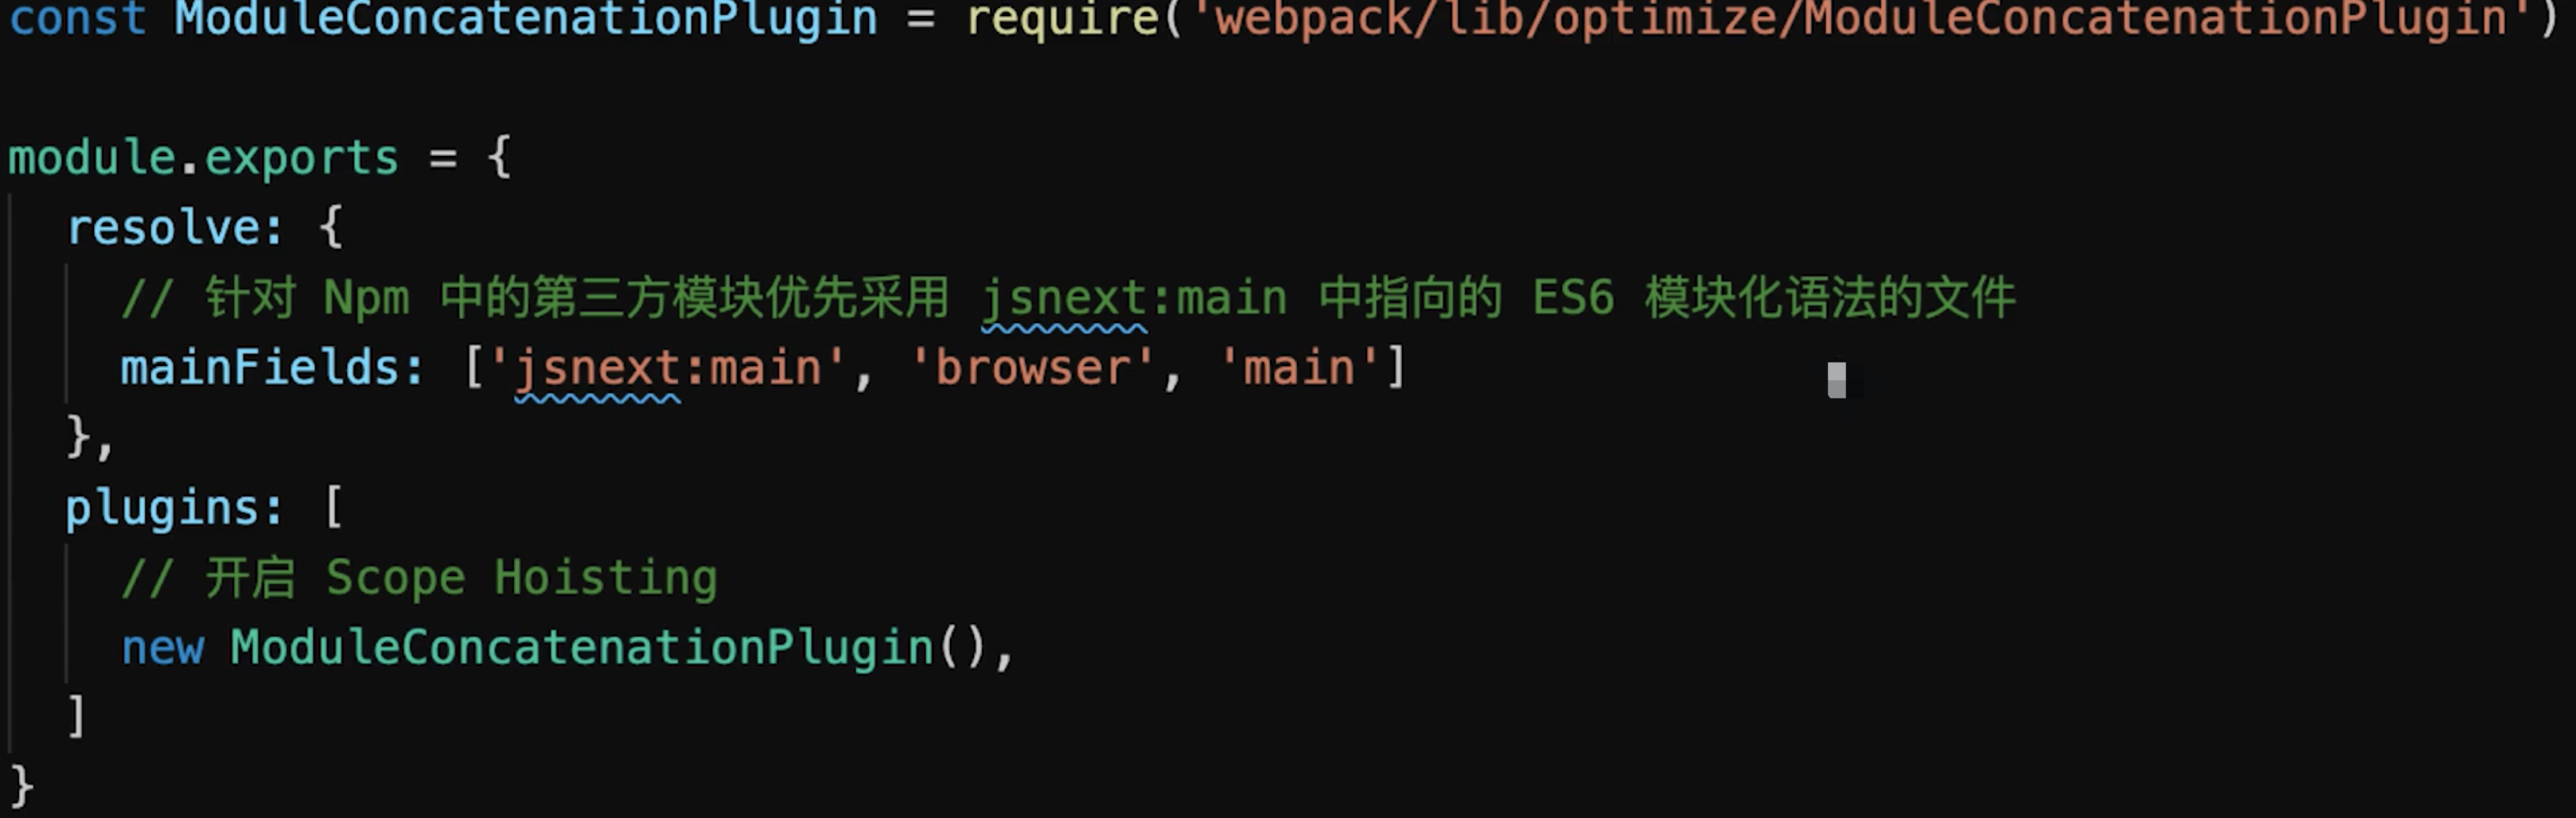
Scope Hoisting:是webpack3引入的一个新特性,它会分析出模块之间的依赖关系,尽可能地把打散的模块合并到一个函数中去,减少代码间的引用,从而减少代码体积- 减少代码体积
- 创建函数作用域更少
- 代码可读性更好
5 webpack原理简述
1.1 核心概念
JavaScript 的 模块打包工具 (module bundler)。通过分析模块之间的依赖,最终将所有模块打包成一份或者多份代码包 (bundler),供 HTML 直接引用。实质上,Webpack 仅仅提供了 打包功能 和一套 文件处理机制,然后通过生态中的各种 Loader 和 Plugin 对代码进行预编译和打包。因此 Webpack 具有高度的可拓展性,能更好的发挥社区生态的力量。
- Entry: 入口文件,Webpack会从该文件开始进行分析与编译;
- Output: 出口路径,打包后创建 bundler的文件路径以及文件名;
- Module: 模块,在 Webpack 中任何文件都可以作为一个模块,会根据配置的不同的 Loader 进行加载和打包;
- Chunk: 代码块,可以根据配置,将所有模块代码合并成一个或多个代码块,以便按需加载,提高性能;
- Loader: 模块加载器,进行各种文件类型的加载与转换;
- Plugin: 拓展插件,可以通过 Webpack 相应的事件钩子,介入到打包过程中的任意环节,从而对代码按需修改;
1.2 工作流程 (加载 - 编译 - 输出)
- 读取配置文件,按命令 初始化 配置参数,创建 Compiler 对象;
- 调用插件的 apply 方法 挂载插件 监听,然后从入口文件开始执行编译;
- 按文件类型,调用相应的 Loader 对模块进行 编译,并在合适的时机点触发对应的事件,调用 Plugin 执行,最后再根据模块 依赖查找 到所依赖的模块,递归执行第三步;
- 将编译后的所有代码包装成一个个代码块 (Chuck), 并按依赖和配置确定 输出内容。这个步骤,仍然可以通过 Plugin 进行文件的修改;
- 最后,根据 Output 把文件内容一一写入到指定的文件夹中,完成整个过程;
1.3 模块包装
    (function(modules) {
    	// 模拟 require 函数,从内存中加载模块;
    	function __webpack_require__(moduleId) {
    		// 缓存模块
    		if (installedModules[moduleId]) {
    			return installedModules[moduleId].exports;
    		}

    		var module = installedModules[moduleId] = {
    			i: moduleId,
    			l: false,
    			exports: {}
    		};

    		// 执行代码;
    		modules[moduleId].call(module.exports, module, module.exports, __webpack_require__);

    		// Flag: 标记是否加载完成;
    		module.l = true;

    		return module.exports;
    	}

    	// ...

    	// 开始执行加载入口文件;
    	return __webpack_require__(__webpack_require__.s = "./src/index.js");
     })({
     	"./src/index.js": function (module, __webpack_exports__, __webpack_require__) {
    		// 使用 eval 执行编译后的代码;
    		// 继续递归引用模块内部依赖;
    		// 实际情况并不是使用模板字符串,这里是为了代码的可读性;
    		eval(`
    			__webpack_require__.r(__webpack_exports__);
    			//
    			var _test__WEBPACK_IMPORTED_MODULE_0__ = __webpack_require__("test", ./src/test.js");
    		`);
    	},
    	"./src/test.js": function (module, __webpack_exports__, __webpack_require__) {
    		// ...
    	},
     })
总结:
- 模块机制 : webpack自己实现了一套模拟模块的机制,将其包裹于业务代码的外部,从而提供了一套模块机制;
- 文件编译 : webpack 规定了一套编译规则,通过 Loader 和 Plugin,以管道的形式对文件字符串进行处理;
1.4 webpack的打包原理
初始化参数:从配置文件和 Shell 语句中读取与合并参数,得出最终的参数开始编译:用上一步得到的参数初始化 Compiler 对象,加载所有配置的插件,执行对象的 run 方法开始执行编译确定入口:根据配置中的 entry 找出所有的入口文件编译模块:从入口文件出发,调用所有配置的 Loader 对模块进行翻译,再找出该模块依赖的模块,再递归本步骤直到所有入口依赖的文件都经过了本步骤的处理完成模块编译:在经过第4步使用 Loader 翻译完所有模块后,得到了每个模块被翻译后的最终内容以及它们之间的依赖关系输出资源:根据入口和模块之间的依赖关系,组装成一个个包含多个模块的 Chunk,再把每个 Chunk 转换成一个单独的文件加入到输出列表,这步是可以修改输出内容的最后机会输出完成:在确定好输出内容后,根据配置确定输出的路径和文件名,把文件内容写入到文件系统
1.5 webpack的打包原理详细
相关问题
webpack工作流程是怎样的webpack在不同阶段做了什么事情
webpack 是一种模块打包工具,可以将各类型的资源,例如图片、CSS、JS 等,转译组合为 JS 格式的 bundle 文件
webpack 构建的核心任务是完成内容转化和资源合并。主要包含以下 3 个阶段:
- 初始化阶段
- 初始化参数 :从配置文件、配置对象和 Shell 参数中读取并与默认参数进行合并,组合成最终使用的参数
- 创建编译对象 :用上一步得到的参数创建
Compiler对象。 - 初始化编译环境 :包括注入内置插件、注册各种模块工厂、初始化
RuleSet集合、加载配置的插件等
- 构建阶段
- 开始编译 :执行
Compiler对象的run方法,创建Compilation对象。 - 确认编译入口 :进入
entryOption阶段,读取配置的Entries,递归遍历所有的入口文件,调用Compilation.addEntry将入口文件转换为 Dependency 对象。 - 编译模块(make) : 调用
normalModule中的build开启构建,从entry文件开始,调用loader对模块进行转译处理,然后调用 JS 解释器(acorn)将内容转化为AST对象,然后递归分析依赖,依次处理全部文件。 - 完成模块编译 :在上一步处理好所有模块后,得到模块编译产物和依赖关系图
- 生成阶段
- 输出资源(seal) :根据入口和模块之间的依赖关系,组装成多个包含多个模块的
Chunk,再把每个Chunk转换成一个Asset加入到输出列表,这步是可以修改输出内容的最后机会。 - 写入文件系统(emitAssets) :确定好输出内容后,根据配置的
output将内容写入文件系统
知识点深入
1. webpack 初始化过程
从 webpack 项目 webpack.config.js 文件 webpack 方法出发,可以看到初始化过程如下:
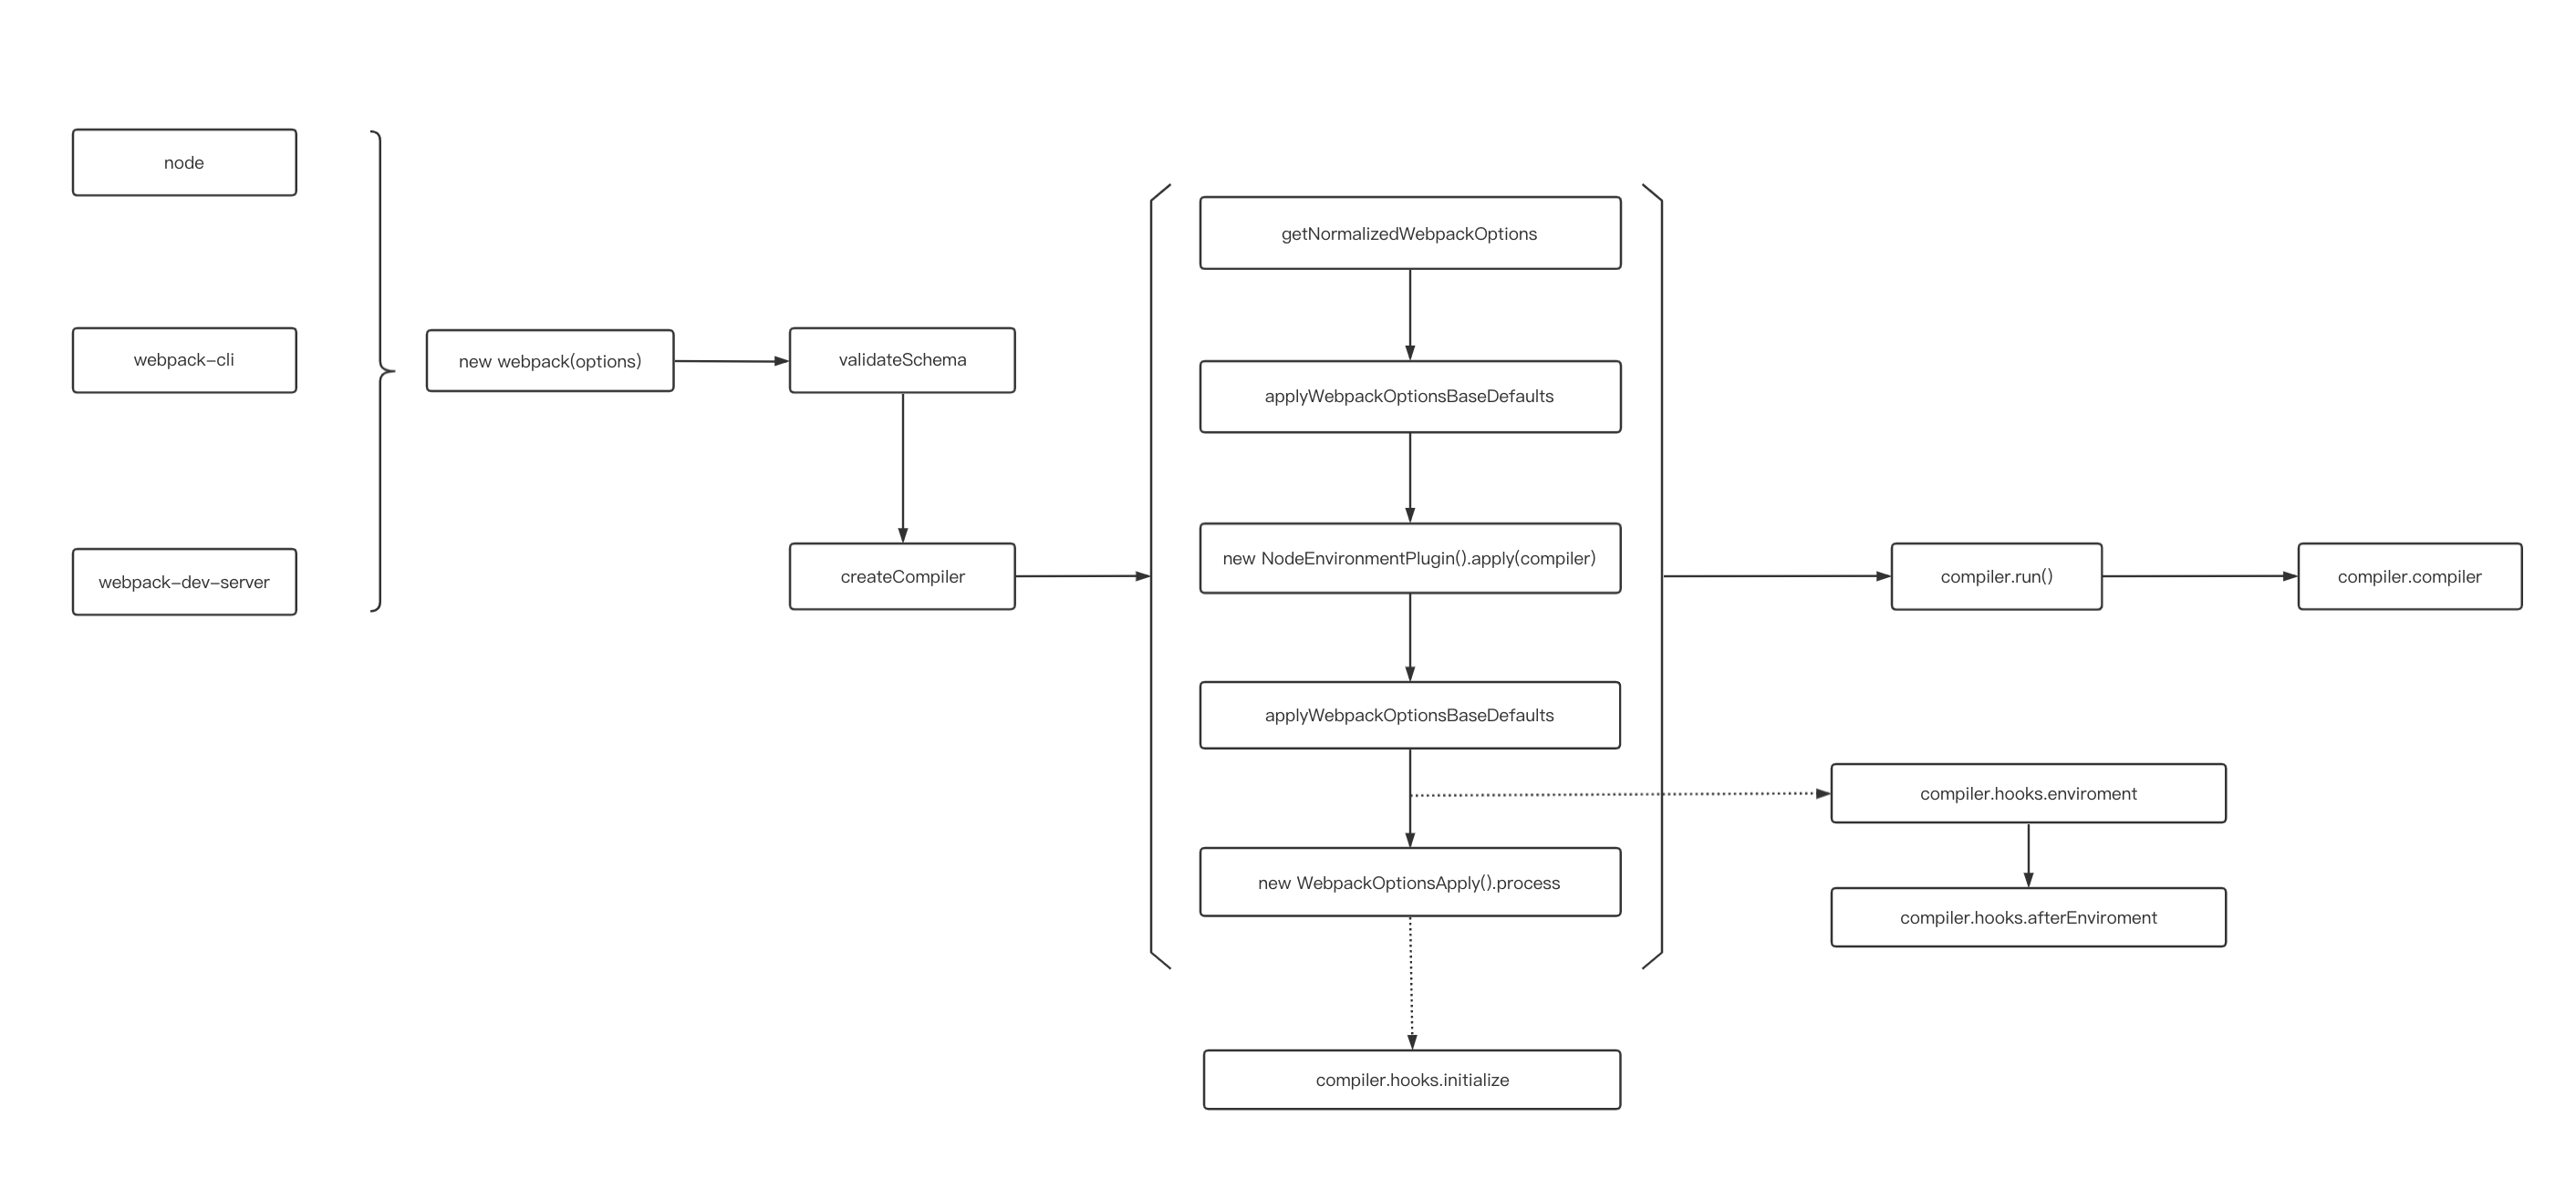
- 将命令行参数和用户的配置文件进行合并
- 调用
getValidateSchema对配置进行校验 - 调用
createCompiler创建Compiler对象- 将用户配置和默认配置进行合并处理
- 实例化
Compiler - 实例化
NodeEnvironmentPlugin - 处理用户配置的
plugins,执行plugin的apply方法。 - 触发
environment和afterEnvironment上注册的事件。 - 注册
webpack内部插件。 - 触发
initialize事件
    // lib/webpack.js 122 行 部分代码省略处理
    const create = () => {
      if (!webpackOptionsSchemaCheck(options)) {
        // 校验参数
        getValidateSchema()(webpackOptionsSchema, options);
      }
      // 创建 compiler 对象
      compiler = createCompiler(webpackOptions);
    };

    // lib/webpack.js 57 行
    const createCompiler = (rawOptions) => {
      // 统一合并处理参数
      const options = getNormalizedWebpackOptions(rawOptions);
      applyWebpackOptionsBaseDefaults(options);
      // 实例化 compiler
      const compiler = new Compiler(options.context);
      // 把 options 挂载到对象上
      compiler.options = options;
      // NodeEnvironmentPlugin 是对 fs 模块的封装,用来处理文件输入输出等
      new NodeEnvironmentPlugin({
        infrastructureLogging: options.infrastructureLogging,
      }).apply(compiler);
      // 注册用户配置插件
      if (Array.isArray(options.plugins)) {
        for (const plugin of options.plugins) {
          if (typeof plugin === "function") {
            plugin.call(compiler, compiler);
          } else {
            plugin.apply(compiler);
          }
        }
      }
      applyWebpackOptionsDefaults(options);
      // 触发 environment 和 afterEnvironment 上注册的事件
      compiler.hooks.environment.call();
      compiler.hooks.afterEnvironment.call();
      // 注册 webpack 内置插件
      new WebpackOptionsApply().process(options, compiler);
      compiler.hooks.initialize.call();
      return compiler;
    };
2. webpack 构建阶段做了什么
在 webpack 函数执行完之后,就到主要的构建阶段,首先执行 compiler.run(),然后触发一系列钩子函数,执行 compiler.compile()

- 在实例化
compiler之后,执行compiler.run() - 执行
newCompilation函数,调用createCompilation初始化Compilation对象 - 执行
_addEntryItem将入口文件存入this.entries(map对象),遍历this.entries对象构建chunk。 - 执行
handleModuleCreation,开始创建模块实例。 - 执行
moduleFactory.create创建模块- 执行
factory.hooks.factorize.call钩子,然后会调用ExternalModuleFactoryPlugin中注册的钩子,用于配置外部文件的模块加载方式 - 使用
enhanced-resolve解析模块和loader的真实绝对路径 - 执行
new NormalModule()创建module实例
- 执行
- 执行
addModule,存储module - 执行
buildModule,添加模块到模块队列buildQueue,开始构建模块, 这里会调用normalModule中的build开启构建- 创建
loader上下文。 - 执行
runLoaders,通过enhanced-resolve解析得到的模块和loader的路径获取函数,执行loader。 - 生成模块的
hash
- 创建
- 所有依赖都解析完毕后,构建阶段结束
      // 构建过程涉及流程比较复杂,代码会做省略

      // lib/webpack.js 1284行
      // 开启编译流程
      compiler.run((err, stats) => {
        compiler.close(err2 => {
          callback(err || err2, stats);
        });
      });

      // lib/compiler.js 1081行
      // 开启编译流程
      compile(callback) {
        const params = this.newCompilationParams();
        // 创建 Compilation 对象
        const Compilation = this.newCompilation(params);
      }

      // lib/Compilation.js 1865行
      // 确认入口文件
      addEntry() {
        this._addEntryItem();
      }

      // lib/Compilation.js 1834行
      // 开始创建模块流程,创建模块实例
      addModuleTree() {
        this.handleModuleCreation()
      }

      // lib/Compilation.js 1548行
      // 开始创建模块流程,创建模块实例
      handleModuleCreation() {
        this.factorizeModule()
      }

      // lib/Compilation.js 1712行
      // 添加到创建模块队列,执行创建模块
      factorizeModule(options, callback) {
        this.factorizeQueue.add(options, callback);
      }

      // lib/Compilation.js 1834行
      // 保存需要构建模块
      _addModule(module, callback) {
        this.modules.add(module);
      }

      // lib/Compilation.js 1284行
      // 添加模块进模块编译队列,开始编译
      buildModule(module, callback) {
        this.buildQueue.add(module, callback);
      }
3. webpack 生成阶段做了什么
构建阶段围绕
module展开,生成阶段则围绕chunks展开。经过构建阶段之后,webpack 得到足够的模块内容与模块关系信息,之后通过Compilation.seal函数生成最终资源
3.1 生成产物
执行 Compilation.seal 进行产物的封装
- 构建本次编译的
ChunkGraph对象,执行buildChunkGraph,这里会将import()、require.ensure等方法生成的动态模块添加到chunks中 - 遍历
Compilation.modules集合,将module按entry/动态引入 的规则分配给不同的Chunk对象。 - 调用
Compilation.emitAssets方法将assets信息记录到Compilation.assets对象中。 - 执行
hooks.optimizeChunkModules的钩子,这里开始进行代码生成和封装。- 执行一系列钩子函数(
reviveModules,moduleId,optimizeChunkIds等) - 执行
createModuleHashes更新模块hash - 执行
JavascriptGenerator生成模块代码,这里会遍历modules,创建构建任务,循环使用JavascriptGenerator构建代码,这时会将import等模块引入方式替换为webpack_require等,并将生成结果存入缓存 - 执行
processRuntimeRequirements,根据生成的内容所使用到的webpack_require的函数,添加对应的代码 - 执行
createHash创建chunk的hash - 执行
clearAssets清除chunk的files和auxiliary,这里缓存的是生成的chunk的文件名,主要是清除上次构建产生的废弃内容
- 执行一系列钩子函数(
3.2 文件输出
回到 Compiler 的流程中,执行 onCompiled 回调。
- 触发
shouldEmit钩子函数,这里是最后能优化产物的钩子。 - 遍历
module集合,根据entry配置及引入资源的方式,将module分配到不同的chunk。 - 遍历
chunk集合,调用Compilation.emitAsset方法标记chunk的输出规则,即转化为assets集合。 - 写入本地文件,用的是 webpack 函数执行时初始化的文件流工具。
- 执行
done钩子函数,这里会执行compiler.run()的回调,再执行compiler.close(),然后执行持久化存储(前提是使用的filesystem缓存模式)
1.6 总结
- 初始化参数 :从配置文件和 Shell 语句中读取并合并参数,得出最终的配置参数。
- 开始编译 :从上一步得到的参数初始化
Compiler对象,加载所有配置的插件,执行对象的run方法开始执行编译。 - 确定入口 :根scope据配置中的
entry找出所有的入口文件。 - 编译模块 :从入口文件出发,调用所有配置的
loader对模块进行翻译,再找出该模块依赖的模块,这个步骤是递归执行的,直至所有入口依赖的模块文件都经过本步骤的处理。 - 完成模块编译 :经过第 4 步使用 loader 翻译完所有模块后,得到了每个模块被翻译后的最终内容以及它们之间的依赖关系。
- 输出资源 :根据入口和模块之间的依赖关系,组装成一个个包含多个模块的
chunk,再把每个chunk转换成一个单独的文件加入到输出列表,这一步是可以修改输出内容的最后机会。 - 输出完成 :在确定好输出内容后,根据配置确定输出的路径和文件名,把文件内容写入到文件系统。
6 webpack热更新原理
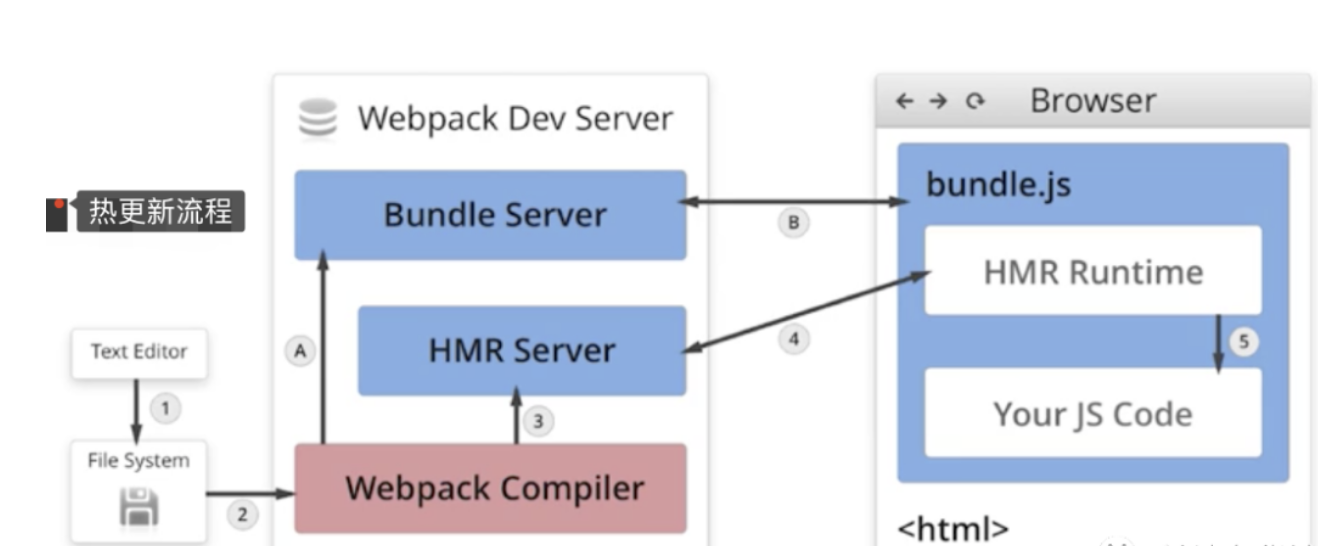
- 当修改了一个或多个文件;
- 文件系统接收更改并通知
webpack; webpack重新编译构建一个或多个模块,并通知 HMR 服务器进行更新;HMR Server使用webSocket通知HMR runtime需要更新,HMR运行时通过HTTP请求更新jsonpHMR运行时替换更新中的模块,如果确定这些模块无法更新,则触发整个页面刷新
7 webpack Loader
由于 Webpack 是基于 Node,因此 Webpack 其实是只能识别 js 模块,比如 css / html / 图片等类型的文件并无法加载,因此就需要一个对 不同格式文件转换器。其实 Loader 做的事,也并不难理解: 对 Webpack 传入的字符串进行按需修改。例如一个最简单的 Loader:
    // html-loader/index.js
    module.exports = function(htmlSource) {
    	// 返回处理后的代码字符串
    	// 删除 html 文件中的所有注释
    	return htmlSource.replace(/<!--[\w\W]*?-->/g, '')
    }
当然,实际的 Loader 不会这么简单,通常是需要将代码进行分析,构建 AST (抽象语法树), 遍历进行定向的修改后,再重新生成新的代码字符串。如我们常用的 Babel-loader 会执行以下步骤:
babylon将ES6/ES7代码解析成ASTbabel-traverse对AST进行遍历转译,得到新的 AST- 新
AST通过babel-generator转换成ES5
Loader 特性:
- 链式传递,按照配置时相反的顺序链式执行;
- 基于 Node 环境,拥有 较高权限,比如文件的增删查改;
- 可同步也可异步;
常用 Loader:
file-loader: 加载文件资源,如 字体 / 图片 等,具有移动/复制/命名等功能;url-loader: 通常用于加载图片,可以将小图片直接转换为 Date Url,减少请求;babel-loader: 加载 js / jsx 文件, 将 ES6 / ES7 代码转换成 ES5,抹平兼容性问题;ts-loader: 加载 ts / tsx 文件,编译 TypeScript;style-loader: 将 css 代码以<style>标签的形式插入到 html 中;css-loader: 分析@import和url(),引用 css 文件与对应的资源;postcss-loader: 用于 css 的兼容性处理,具有众多功能,例如 添加前缀,单位转换 等;less-loader / sass-loader: css预处理器,在 css 中新增了许多语法,提高了开发效率;
编写原则:
- 单一原则: 每个 Loader 只做一件事;
- 链式调用: Webpack 会按顺序链式调用每个 Loader;
- 统一原则: 遵循 Webpack制定的设计规则和结构,输入与输出均为字符串,各个 Loader 完全独立,即插即用;
8 webpack Plugin
插件系统是 Webpack 成功的一个关键性因素。在编译的整个生命周期中,Webpack 会触发许多事件钩子,Plugin 可以监听这些事件,根据需求在相应的时间点对打包内容进行定向的修改。
一个最简单的 plugin 是这样的:
    class Plugin{
      	// 注册插件时,会调用 apply 方法
      	// apply 方法接收 compiler 对象
      	// 通过 compiler 上提供的 Api,可以对事件进行监听,执行相应的操作
      	apply(compiler){
      		// compilation 是监听每次编译循环
      		// 每次文件变化,都会生成新的 compilation 对象并触发该事件
        	compiler.plugin('compilation',function(compilation) {})
      	}
    }
注册插件:
    // webpack.config.js
    module.export = {
    	plugins:[
    		new Plugin(options),
    	]
    }
事件流机制:
Webpack 就像工厂中的一条产品流水线。原材料经过 Loader 与 Plugin 的一道道处理,最后输出结果。
- 通过链式调用,按顺序串起一个个 Loader;
- 通过事件流机制,让 Plugin 可以插入到整个生产过程中的每个步骤中;
Webpack 事件流编程范式的核心是基础类 Tapable,是一种 观察者模式 的实现事件的订阅与广播:
    const { SyncHook } = require("tapable")

    const hook = new SyncHook(['arg'])

    // 订阅
    hook.tap('event', (arg) => {
    	// 'event-hook'
    	console.log(arg)
    })

    // 广播
    hook.call('event-hook')
Webpack中两个最重要的类Compiler与Compilation便是继承于Tapable,也拥有这样的事件流机制。
Compiler : 可以简单的理解为 Webpack 实例,它包含了当前 Webpack 中的所有配置信息,如 options, loaders, plugins 等信息,全局唯一,只在启动时完成初始化创建,随着生命周期逐一传递;
Compilation: 可以称为 编译实例。当监听到文件发生改变时,Webpack 会创建一个新的 Compilation 对象,开始一次新的编译。它包含了当前的输入资源,输出资源,变化的文件等,同时通过它提供的 api,可以监听每次编译过程中触发的事件钩子;区别:
Compiler全局唯一,且从启动生存到结束;Compilation对应每次编译,每轮编译循环均会重新创建;
常用 Plugin:
- UglifyJsPlugin: 压缩、混淆代码;
- CommonsChunkPlugin: 代码分割;
- ProvidePlugin: 自动加载模块;
- html-webpack-plugin: 加载 html 文件,并引入 css / js 文件;
- extract-text-webpack-plugin / mini-css-extract-plugin: 抽离样式,生成 css 文件; DefinePlugin: 定义全局变量;
- optimize-css-assets-webpack-plugin: CSS 代码去重;
- webpack-bundle-analyzer: 代码分析;
- compression-webpack-plugin: 使用 gzip 压缩 js 和 css;
- happypack: 使用多进程,加速代码构建;
- EnvironmentPlugin: 定义环境变量;
调用插件
apply函数传入compiler对象通过
compiler对象监听事件
loader和plugin有什么区别?
webapck默认只能打包JS和JOSN模块,要打包其它模块,需要借助loader,loader就可以让模块中的内容转化成webpack或其它laoder可以识别的内容。
loader就是模块转换化,或叫加载器。不同的文件,需要不同的loader来处理。plugin是插件,可以参与到整个webpack打包的流程中,不同的插件,在合适的时机,可以做不同的事件。
webpack中都有哪些插件,这些插件有什么作用?
html-webpack-plugin自动创建一个HTML文件,并把打包好的JS插入到HTML文件中clean-webpack-plugin在每一次打包之前,删除整个输出文件夹下所有的内容mini-css-extrcat-plugin抽离CSS代码,放到一个单独的文件中optimize-css-assets-plugin压缩css
实现一个编译结束退出命令的插件
    apply (compiler) {
      const afterEmit = (compilation, cb) => {
        cb()
        setTimeout(function () {
          process.exit(0)
        }, 1000)
      }

      compiler.plugin('after-emit', afterEmit)
    }
    }

    module.exports = BuildEndPlugin
    <script>
    export default {
      mounted () {
        var isGithub = location.href.indexOf('FE-Interview-Questions')!==-1
        var sId = isGithub ? '59154049' : '66575297'
        var script = document.createElement("script");
        script.type = "text/javascript"
        script.charset="UTF-8"
        script.src = `http://tajs.qq.com/stats?sId=${sId}`
        document.body.appendChild(script);
      }
    }
    </script>
9 webpack编译优化
代码优化:
无用代码消除,是许多编程语言都具有的优化手段,这个过程称为 DCE (dead code elimination),即 删除不可能执行的代码;
例如我们的 UglifyJs,它就会帮我们在生产环境中删除不可能被执行的代码,例如:
    var fn = function() {
    	return 1;
    	// 下面代码便属于 不可能执行的代码;
    	// 通过 UglifyJs (Webpack4+ 已内置) 便会进行 DCE;
    	var a = 1;
    	return a;
    }
摇树优化 (Tree-shaking),这是一种形象比喻。我们把打包后的代码比喻成一棵树,这里其实表示的就是,通过工具 "摇" 我们打包后的 js 代码,将没有使用到的无用代码 "摇" 下来 (删除)。即 消除那些被 引用了但未被使用 的模块代码。
- 原理: 由于是在编译时优化,因此最基本的前提就是语法的静态分析,ES6的模块机制 提供了这种可能性。不需要运行时,便可进行代码字面上的静态分析,确定相应的依赖关系。
- 问题: 具有 副作用 的函数无法被
tree-shaking- 在引用一些第三方库,需要去观察其引入的代码量是不是符合预期;
- 尽量写纯函数,减少函数的副作用;
- 可使用
webpack-deep-scope-plugin,可以进行作用域分析,减少此类情况的发生,但仍需要注意;
code-spliting: 代码分割技术 ,将代码分割成多份进行 懒加载 或 异步加载,避免打包成一份后导致体积过大,影响页面的首屏加载;
Webpack中使用SplitChunksPlugin进行拆分;- 按 页面 拆分: 不同页面打包成不同的文件;
- 按 功能 拆分:
- 将类似于播放器,计算库等大模块进行拆分后再懒加载引入;
- 提取复用的业务代码,减少冗余代码;
- 按 文件修改频率 拆分: 将第三方库等不常修改的代码单独打包,而且不改变其文件 hash 值,能最大化运用浏览器的缓存;
scope hoisting : 作用域提升,将分散的模块划分到同一个作用域中,避免了代码的重复引入,有效减少打包后的代码体积和运行时的内存损耗;
编译性能优化:
- 升级至 最新 版本的
webpack,能有效提升编译性能; - 使用
dev-server/ 模块热替换 (HMR) 提升开发体验;- 监听文件变动 忽略 node_modules 目录能有效提高监听时的编译效率;
- 缩小编译范围
modules: 指定模块路径,减少递归搜索;mainFields: 指定入口文件描述字段,减少搜索;noParse: 避免对非模块化文件的加载;includes/exclude: 指定搜索范围/排除不必要的搜索范围;alias: 缓存目录,避免重复寻址;
babel-loader- 忽略
node_moudles,避免编译第三方库中已经被编译过的代码 - 使用
cacheDirectory,可以缓存编译结果,避免多次重复编译
- 忽略
- 多进程并发
webpack-parallel-uglify-plugin: 可多进程并发压缩 js 文件,提高压缩速度;HappyPack: 多进程并发文件的Loader解析;
- 第三方库模块缓存:
DLLPlugin和DLLReferencePlugin可以提前进行打包并缓存,避免每次都重新编译;
- 使用分析
Webpack Analyse / webpack-bundle-analyzer对打包后的文件进行分析,寻找可优化的地方- 配置profile:true,对各个编译阶段耗时进行监控,寻找耗时最多的地方
source-map:- 开发:
cheap-module-eval-source-map - 生产:
hidden-source-map;
- 开发:
优化webpack打包速度
- 减少文件搜索范围
- 比如通过别名
loader的test,include & exclude
Webpack4默认压缩并行Happypack并发调用babel也可以缓存编译
10 webpack import()原理
动态导入原理
用于动态加载的
import()方法
- 这个功能可以实现按需加载我们的代码,并且使用了
promise式的回调,获取加载的包 - 在代码中所有被
import()的模块,都将打成一个单独的包,放在chunk存储的目录下。在浏览器运行到这一行代码时,就会自动请求这个资源,实现异步加载
    // 这里是一个简单的demo。
    // 可以看到,import()的语法十分简单。该函数只接受一个参数,就是引用包的地址
    import('lodash').then(_ => {
      // Do something with lodash (a.k.a '_')...
     })
webpack中如何实现动态导入?
- 使用
import(/** webpackChunkName: "lodash" **/ 'lodash').then(_ => {}),同时可以在webpack.config.js中配置一下output的chunkFilename为[name].bunld.js将要导入的模块单独抽离到一个bundle中,以此实现代码分离。 - 使用
async,由于import()返回的是一个promise, 因此我们可以使用async函数来简化它,不过需要babel这样的预处理器及处理转换async的插件。const _ = await import(/* webpackChunkName: "lodash" */ 'lodash');
11 webpack有哪几种文件指纹?
hash是跟整个项目的构建相关,只要项目里有文件更改,整个项目构建的hash值都会更改,并且全部文件都共用相同的hash值。(粒度整个项目)chunkhash是根据不同的入口进行依赖文件解析,构建对应的chunk(模块),生成对应的hash值。只有被修改的chunk(模块)在重新构建之后才会生成新的hash值,不会影响其它的chunk。(粒度entry的每个入口文件)contenthash是跟每个生成的文件有关,每个文件都有一个唯一的hash值。当要构建的文件内容发生改变时,就会生成新的hash值,且该文件的改变并不会影响和它同一个模块下的其它文件。(粒度每个文件的内容)
webpack如果使用了hash命名,那是每次都会重写生成hash吗
有三种情况:
- 如果是
hash的话,是和整个项目有关的,有一处文件发生更改则所有文件的hash值都会发生改变且它们共用一个hash值; - 如果是
chunkhash的话,只和entry的每个入口文件有关,也就是同一个chunk下的文件有所改动该chunk下的文件的hash值就会发生改变 - 如果是
contenthash的话,和每个生成的文件有关,只有当要构建的文件内容发生改变时才会给该文件生成新的hash值,并不会影响其它文件。
12 webpack中如何处理图片的?
在webpack中有两种处理图片的loader:
file-loader:解决CSS等中引入图片的路径问题;(解决通过url,import/require()等引入图片的问题)url-loader:当图片小于设置的limit参数值时,url-loader将图片进行base64编码(当项目中有很多图片,通过url-loader进行base64编码后会减少http请求数量,提高性能),大于limit参数值,则使用file-loader拷贝图片并输出到编译目录中;
13 webpack常用插件总结
1. 功能类
1.1 html-webpack-plugin
自动生成
html,基本用法:
    new HtmlWebpackPlugin({
      filename: 'index.html', // 生成文件名
      template: path.join(process.cwd(), './index.html') // 模班文件
    })
1.2 copy-webpack-plugin
拷贝资源插件
    new CopyWebpackPlugin([
      {
        from: path.join(process.cwd(), './vendor/'),
        to: path.join(process.cwd(), './dist/'),
        ignore: ['*.json']
      }
    ])
1.3 webpack-manifest-plugin && assets-webpack-plugin
俩个插件效果一致,都是生成编译结果的资源单,只是资源单的数据结构不一致而已
webpack-manifest-plugin 基本用法
    module.exports = {
      plugins: [
        new ManifestPlugin()
      ]
    }
assets-webpack-plugin 基本用法
    module.exports = {
      plugins: [
        new AssetsPlugin()
      ]
    }
1.4 clean-webpack-plugin
在编译之前清理指定目录指定内容
    // 清理目录
    const pathsToClean = [
      'dist',
      'build'
    ]

    // 清理参数
    const cleanOptions = {
      exclude:  ['shared.js'], // 跳过文件
    }
    module.exports = {
      // ...
      plugins: [
        new CleanWebpackPlugin(pathsToClean, cleanOptions)
      ]
    }
1.5 compression-webpack-plugin
提供带
Content-Encoding编码的压缩版的资源
    module.exports = {
      plugins: [
        new CompressionPlugin()
      ]
    }
1.6 progress-bar-webpack-plugin
编译进度条插件
    module.exports = {
      //...
      plugins: [
        new ProgressBarPlugin()
      ]
    }
2. 代码相关类
2.1 webpack.ProvidePlugin
自动加载模块,如
$出现,就会自动加载模块;$默认为'jquery'的exports
    new webpack.ProvidePlugin({
      $: 'jquery',
    })
2.2 webpack.DefinePlugin
定义全局常量
    new webpack.DefinePlugin({
      'process.env': {
        NODE_ENV: JSON.stringify(process.env.NODE_ENV)
      }
    })
2.3 mini-css-extract-plugin && extract-text-webpack-plugin
提取css样式,对比
mini-css-extract-plugin为webpack4及以上提供的plugin,支持css chunkextract-text-webpack-plugin只能在webpack3及一下的版本使用,不支持css chunk
基本用法 extract-text-webpack-plugin
    const ExtractTextPlugin = require("extract-text-webpack-plugin");

    module.exports = {
      module: {
        rules: [
          {
            test: /\.css$/,
            use: ExtractTextPlugin.extract({
              fallback: "style-loader",
              use: "css-loader"
            })
          }
        ]
      },
      plugins: [
        new ExtractTextPlugin("styles.css"),
      ]
    }
基本用法 mini-css-extract-plugin
    const MiniCssExtractPlugin = require("mini-css-extract-plugin");
    module.exports = {
        module: {
        rules: [
          {
            test: /\.css$/,
            use: [
              {
                loader: MiniCssExtractPlugin.loader,
                options: {
                  publicPath: '/'  // chunk publicPath
                }
              },
              "css-loader"
            ]
          }
        ]
      },
      plugins: [
        new MiniCssExtractPlugin({
          filename: "[name].css", // 主文件名
          chunkFilename: "[id].css"  // chunk文件名
        })
      ]
    }
3. 编译结果优化类
3.1 wbepack.IgnorePlugin
忽略
regExp匹配的模块
new webpack.IgnorePlugin(/^\.\/locale$/, /moment$/)
3.2 uglifyjs-webpack-plugin
代码丑化,用于js压缩
    module.exports = {
      //...
      optimization: {
        minimizer: [new UglifyJsPlugin({
          cache: true,   // 开启缓存
          parallel: true, // 开启多线程编译
          sourceMap: true,  // 是否sourceMap
          uglifyOptions: {  // 丑化参数
            comments: false,
            warnings: false,
            compress: {
              unused: true,
              dead_code: true,
              collapse_vars: true,
              reduce_vars: true
            },
            output: {
              comments: false
            }
          }
        }]
      }
    };
3.3 optimize-css-assets-webpack-plugin
css压缩,主要使用
cssnano压缩器 https://github.com/cssnano/cssnano
    module.exports = {
      //...
      optimization: {
        minimizer: [new OptimizeCssAssetsPlugin({
          cssProcessor: require('cssnano'),   // css 压缩优化器
          cssProcessorOptions: { discardComments: { removeAll: true } } // 去除所有注释
        })]
      }
    };
3.4 webpack-md5-hash
使你的
chunk根据内容生成md5,用这个md5取代webpack chunkhash。
    var WebpackMd5Hash = require('webpack-md5-hash');

    module.exports = {
      // ...
      output: {
        //...
        chunkFilename: "[chunkhash].[id].chunk.js"
      },
      plugins: [
        new WebpackMd5Hash()
      ]
    };
3.5 SplitChunksPlugin
CommonChunkPlugin的后世,用于chunk切割。
webpack把chunk分为两种类型,一种是初始加载initial chunk,另外一种是异步加载async chunk,如果不配置SplitChunksPlugin,webpack会在production的模式下自动开启,默认情况下,webpack会将node_modules下的所有模块定义为异步加载模块,并分析你的entry、动态加载(import()、require.ensure)模块,找出这些模块之间共用的node_modules下的模块,并将这些模块提取到单独的chunk中,在需要的时候异步加载到页面当中,其中默认配置如下
    module.exports = {
      //...
      optimization: {
        splitChunks: {
          chunks: 'async', // 异步加载chunk
          minSize: 30000,
          maxSize: 0,
          minChunks: 1,
          maxAsyncRequests: 5,
          maxInitialRequests: 3,
          automaticNameDelimiter: '~', // 文件名中chunk分隔符
          name: true,
          cacheGroups: {
            vendors: {
              test: /[\\/]node_modules[\\/]/,  //
              priority: -10
            },
            default: {
              minChunks: 2,  // 最小的共享chunk数
              priority: -20,
              reuseExistingChunk: true
            }
          }
        }
      }
    };
4. 编译优化类
4.1 DllPlugin && DllReferencePlugin && autodll-webpack-plugin
dllPlugin将模块预先编译,DllReferencePlugin将预先编译好的模块关联到当前编译中,当webpack解析到这些模块时,会直接使用预先编译好的模块。autodll-webpack-plugin相当于dllPlugin和DllReferencePlugin的简化版,其实本质也是使用dllPlugin && DllReferencePlugin,它会在第一次编译的时候将配置好的需要预先编译的模块编译在缓存中,第二次编译的时候,解析到这些模块就直接使用缓存,而不是去编译这些模块
dllPlugin 基本用法:
    const output = {
      filename: '[name].js',
      library: '[name]_library',
      path: './vendor/'
    }

    module.exports = {
      entry: {
        vendor: ['react', 'react-dom']  // 我们需要事先编译的模块,用entry表示
      },
      output: output,
      plugins: [
        new webpack.DllPlugin({  // 使用dllPlugin
          path: path.join(output.path, `${output.filename}.json`),
          name: output.library // 全局变量名, 也就是 window 下 的 [output.library]
        })
      ]
    }
DllReferencePlugin 基本用法:
    const manifest = path.resolve(process.cwd(), 'vendor', 'vendor.js.json')

    module.exports = {
      plugins: [
        new webpack.DllReferencePlugin({
          manifest: require(manifest), // 引进dllPlugin编译的json文件
          name: 'vendor_library' // 全局变量名,与dllPlugin声明的一致
        }
      ]
    }
autodll-webpack-plugin 基本用法:
    module.exports = {
      plugins: [
        new AutoDllPlugin({
          inject: true, // 与 html-webpack-plugin 结合使用,注入html中
          filename: '[name].js',
          entry: {
            vendor: [
              'react',
              'react-dom'
            ]
          }
        })
      ]
    }
4.2 happypack && thread-loader
多线程编译,加快编译速度,
thread-loader不可以和mini-css-extract-plugin结合使用
happypack 基本用法
    const HappyPack = require('happypack');
    const os = require('os');
    const happyThreadPool = HappyPack.ThreadPool({ size: os.cpus().length });
    const happyLoaderId = 'happypack-for-react-babel-loader';

    module.exports = {
      module: {
        rules: [{
          test: /\.jsx?$/,
          loader: 'happypack/loader',
          query: {
            id: happyLoaderId
          },
          include: [path.resolve(process.cwd(), 'src')]
        }]
      },
      plugins: [new HappyPack({
        id: happyLoaderId,
        threadPool: happyThreadPool,
        loaders: ['babel-loader']
      })]
    }
thread-loader 基本用法
    module.exports = {
      module: {
        rules: [
          {
            test: /\.js$/,
            include: path.resolve("src"),
            use: [
              "thread-loader",
              // your expensive loader (e.g babel-loader)
              "babel-loader"
            ]
          }
        ]
      }
    }
4.3 hard-source-webpack-plugin && cache-loader
使用模块编译缓存,加快编译速度
hard-source-webpack-plugin 基本用法
    module.exports = {
      plugins: [
        new HardSourceWebpackPlugin()
      ]
    }
cache-loader 基本用法
    module.exports = {
      module: {
        rules: [
          {
            test: /\.ext$/,
            use: [
              'cache-loader',
              ...loaders
            ],
            include: path.resolve('src')
          }
        ]
      }
    }
5. 编译分析类
5.1 webpack-bundle-analyzer
编译模块分析插件
    new BundleAnalyzerPlugin({
      analyzerMode: 'server',
      analyzerHost: '127.0.0.1',
      analyzerPort: 8889,
      reportFilename: 'report.html',
      defaultSizes: 'parsed',
      generateStatsFile: false,
      statsFilename: 'stats.json',
      statsOptions: null,
      logLevel: 'info'
    }),
5.2 stats-webpack-plugin && PrefetchPlugin
stats-webpack-plugin将构建的统计信息写入文件,该文件可在 http://webpack.github.io/analyse中上传进行编译分析,并根据分析结果,可使用PrefetchPlugin对部分模块进行预解析编译
stats-webpack-plugin 基本用法:
    module.exports = {
      plugins: [
        new StatsPlugin('stats.json', {
          chunkModules: true,
          exclude: [/node_modules[\\\/]react/]
        })
      ]
    };
PrefetchPlugin 基本用法:
    module.exports = {
      plugins: [
        new webpack.PrefetchPlugin('/web/', 'app/modules/HeaderNav.jsx'),
        new webpack.PrefetchPlugin('/web/', 'app/pages/FrontPage.jsx')
    ];
    }
5.3 speed-measure-webpack-plugin
统计编译过程中,各
loader和plugin使用的时间
    const SpeedMeasurePlugin = require("speed-measure-webpack-plugin");

    const smp = new SpeedMeasurePlugin();

    const webpackConfig = {
      plugins: [
        new MyPlugin(),
        new MyOtherPlugin()
      ]
    }
    module.exports = smp.wrap(webpackConfig);
14 抽象语法树AST
抽象语法树(
Abstract Syntax Tree),是将代码逐字母解析成 树状对象 的形式。这是语言之间的转换、代码语法检查、代码风格检查、代码格式化、代码高亮、代码错误提示、代码自动补全等等的基础
    // 转换前
    function square(n) {
      return n * n
    }

    // 转换后
    const element = {
      type: "FunctionDeclaration",
      start: 0,
      end: 35,
      id: Identifier,
      expression: false,
      generator: false,
      params: [1, element],
      body: BlockStatement
    }
15 Babel环境搭建和基本配置
.babelrc配置presets和plugins
      "devDependencies": {
        "@babel/cli": "^7.7.5",
        "@babel/core": "^7.7.5",
        "@babel/plugin-transform-runtime": "^7.7.5",
        "@babel/preset-env": "^7.7.5"
      },
      "dependencies": {
        "@babel/polyfill": "^7.7.0",
        "@babel/runtime": "^7.7.5"
      }
    // .babelrc

    {
        "presets": [
            [
                "@babel/preset-env", // 一堆plugins的集合,包含常用的plugins
                {
                    "useBuiltIns": "usage", // 按需引入babel-polyfill
                    "corejs": 3 // corejs版本3
                }
            ]
        ],
        "plugins": [
            [
                "@babel/plugin-transform-runtime",
                {
                    "absoluteRuntime": false,
                    "corejs": 3,
                    "helpers": true,
                    "regenerator": true,
                    "useESModules": false
                }
            ]
        ]
    }
    // 运行编译代码
    npx babel src/index.js
16 使用babel-loader会有哪些问题?可以怎样优化?
- 会使得编译很慢。解决办法是可以在
webpack的babel-loader配置中使用exclude这个可选项来去除一些不需要编译的文件夹(例如node_modules和bower_components),另一种可以设置cacheDirectory选项为true, 开启缓存, 转译的结果将会缓存到文件系统中, 这样使babel-loader至少提速两倍(代码量越多效果应该越明显)。 babel-loader使得打包文件体积过大。Babel对一些公共方法使用了非常小的辅助代码, 比如_extend.默认情况下会被添加到每一个需要它的文件中, 所以会导致打包文件体积过大.解决办法: 引入babel runtime作为一个单独的模块, 来避免重复。也就是可以使用@babel/plugin-transform-runtime和babel-runtime。
17 Babel 原理
babel的编译过程分为三个阶段:parsing 、transforming 、generating ,以 ES6 编译为 ES5 作为例子:
ES6代码输入;babylon进行解析得到 AST;plugin用babel-traverse对AST树进行遍历编译,得到新的AST树;- 用
babel-generator通过AST树生成ES5代码。
[Babel原理及其使用 (opens new window)](http://interview.poetries.top/principle- docs/webpack/05-Babel%E5%8E%9F%E7%90%86%E5%8F%8A%E5%85%B6%E4%BD%BF%E7%94%A8.html)
18 Babel是如何编译Class的?
就拿下面的类来说:
    class Person {
      constructor ({ name }) {
        this.name = name
        this.getSex = function () {
          return 'boy'
        }
      }
      getName () {
        return this.name
      }
      static getLook () {
        return 'sunshine'
      }
    }
当我们在使用babel的这些plugin或者使用preset的时候,有一个配置属性loose它默认是为false,在这样的条件下:
Class编译后:
- 总体来说
Class会被封装成一个IIFE立即执行函数 - 立即执行函数返回的是一个与类同名的构造函数
- 实例属性和方法定义在构造函数内(如
name和getSex()) - 类内部声明的属性方法(
getName)和静态属性方法(getLook)是会被Object.defineProperty所处理,将其可枚举属性设置为false
编译后的代码:
    "use strict";

    function _classCallCheck(instance, Constructor) {
      if (!(instance instanceof Constructor)) {
        throw new TypeError("Cannot call a class as a function");
      }
    }

    function _defineProperties(target, props) {
      for (var i = 0; i < props.length; i++) {
        var descriptor = props[i];
        descriptor.enumerable = descriptor.enumerable || false;
        descriptor.configurable = true;
        if ("value" in descriptor) descriptor.writable = true;
        Object.defineProperty(target, descriptor.key, descriptor);
      }
    }

    function _createClass(Constructor, protoProps, staticProps) {
      if (protoProps) _defineProperties(Constructor.prototype, protoProps);
      if (staticProps) _defineProperties(Constructor, staticProps);
      return Constructor;
    }

    var Person = /*#__PURE__*/ (function () {
      function Person(_ref) {
        var name = _ref.name;

        _classCallCheck(this, Person);

        this.name = name;

        this.getSex = function () {
          return "boy";
        };
      }

      _createClass(
        Person,
        [
          {
            key: "getName",
            value: function getName() {
              return this.name;
            },
          },
        ],
        [
          {
            key: "getLook",
            value: function getLook() {
              return "sunshine";
            },
          },
        ]
      );

      return Person;
    })();
为什么Babel对于类的处理会使用Object.defineProperty这种形式呢?它和直接使用原型链有什么不同吗?
- 通过原型链声明的属性和方法是可枚举的,也就是可以被
for...of...搜寻到 - 而类内部声明的方法是不可枚举的
所以,babel为了符合ES6真正的语义,编译类时采取了Object.defineProperty来定义原型方法。
但是可以通过设置babel的loose模式(宽松模式)为true,它会不严格遵循ES6的语义,而采取更符合我们平常编写代码时的习惯去编译代码,在.babelrc中可以如下设置:
    {
      "presets": [["env", { "loose": true }]]
    }
比如上述的Person类的属性方法将会编译成直接在原型链上声明方法:
    "use strict";

    var Person = /*#__PURE__*/function () {
      function Person(_ref) {
        var name = _ref.name;
        this.name = name;

        this.getSex = function () {
          return 'boy';
        };
      }

      var _proto = Person.prototype;

      _proto.getName = function getName() {
        return this.name;
      };

      Person.getLook = function getLook() {
        return 'sunshine';
      };

      return Person;
    }();
总结
当使用
Babel编译时默认的loose为false,即非宽松模式无论哪种模式,转换后的定义在类内部的属性方法是被定义在构造函数的原型对象上的;静态属性被定义到构造函数上
只不过非宽松模式时,这些属性方法会被
_createClass函数处理,函数内通过Object.defineProperty()设置属性的可枚举值enumerable为false由于在
_createClass函数内使用了Object,所以非宽松模式下是会产生副作用的,而宽松模式下不会。webpack中的UglifyJS依旧还是会将宽松模式认为是有副作用的,而rollup有程序流程分析 的功能,可以更好的判断代码是否真正产生副作用,所以它会认为宽松模式没有副作用。
(副作用大致理解为:一个函数会、或者可能会对函数外部变量产生影响的行为。)
19 Babel Polyfill是什么
- 什么是
Polyfill?Polyfill是一种JavaScript的API的Polyfill,用来模拟实现一些JavaScript的新特性,使得这些新特性能够在旧的浏览器中运行 core-js是一个标准库,提供了一些常用的API的Polyfill,比如Promise、Set、Map等core-js不支持generator,所以需要regenerator-runtime来Polyfill,regenerator-runtime是一个generator的Polyfill@babel/polyfill是core-js和regenerator-runtime的集合,能满足ES6、ES7等新语法的Polyfill需求@babel/polyfill会污染全局变量,所以不推荐使用。在Babel 7.4之后,@babel/polyfill被废弃了,推荐使用core-js和regenerator-runtime来Polyfill
    // 代码中使用babel/polyfill
    // 配置按需引入babel-polyfill 这里不用手动导入
    import "@babel/polyfill"
@babel/polyfill按需引入
- 一次引入文件较大
- 只有一部分功能,无需全部引入
- 配置按需引入
    // .babelrc

    {
        "presets": [
            [
                "@babel/preset-env", // 一堆plugins的集合,包含常用的plugins
                {
                    "useBuiltIns": "usage", // 按需引入babel-polyfill
                    "corejs": 3 // corejs版本3
                }
            ]
        ],
        "plugins": [
            [
                "@babel/plugin-transform-runtime",
                {
                    "absoluteRuntime": false,
                    "corejs": 3,
                    "helpers": true,
                    "regenerator": true,
                    "useESModules": false
                }
            ]
        ]
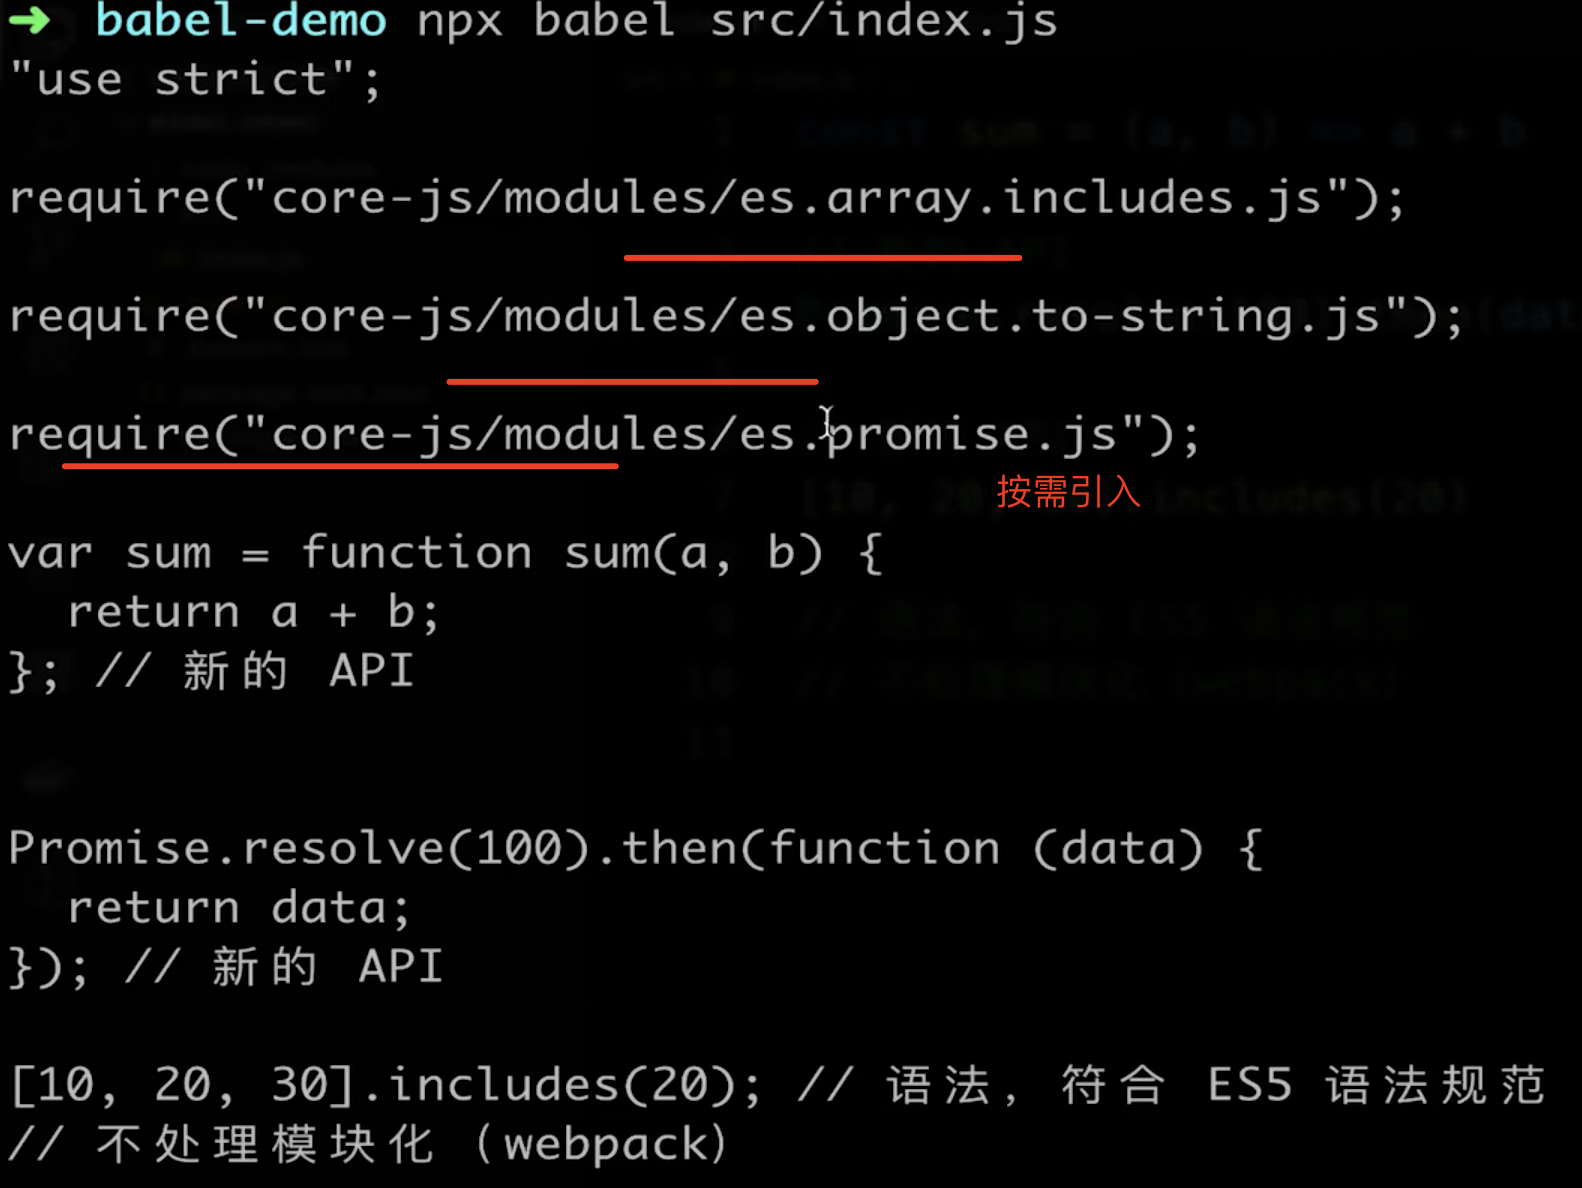
@babel/polyfill的问题
- 会污染全局环境,挂载到
window上, 会影响其他库window.Promise = function(){}使用方使用会覆盖冲突window.Promise = '123' - 如果做一个独立的系统则无碍,但是如果是做一个第三方库,就会有问题
小结
babel-polyfill现在已经被弃用
babel 7.4之后弃用babel-polyfill- 直接推荐使用
core-js和regenerator
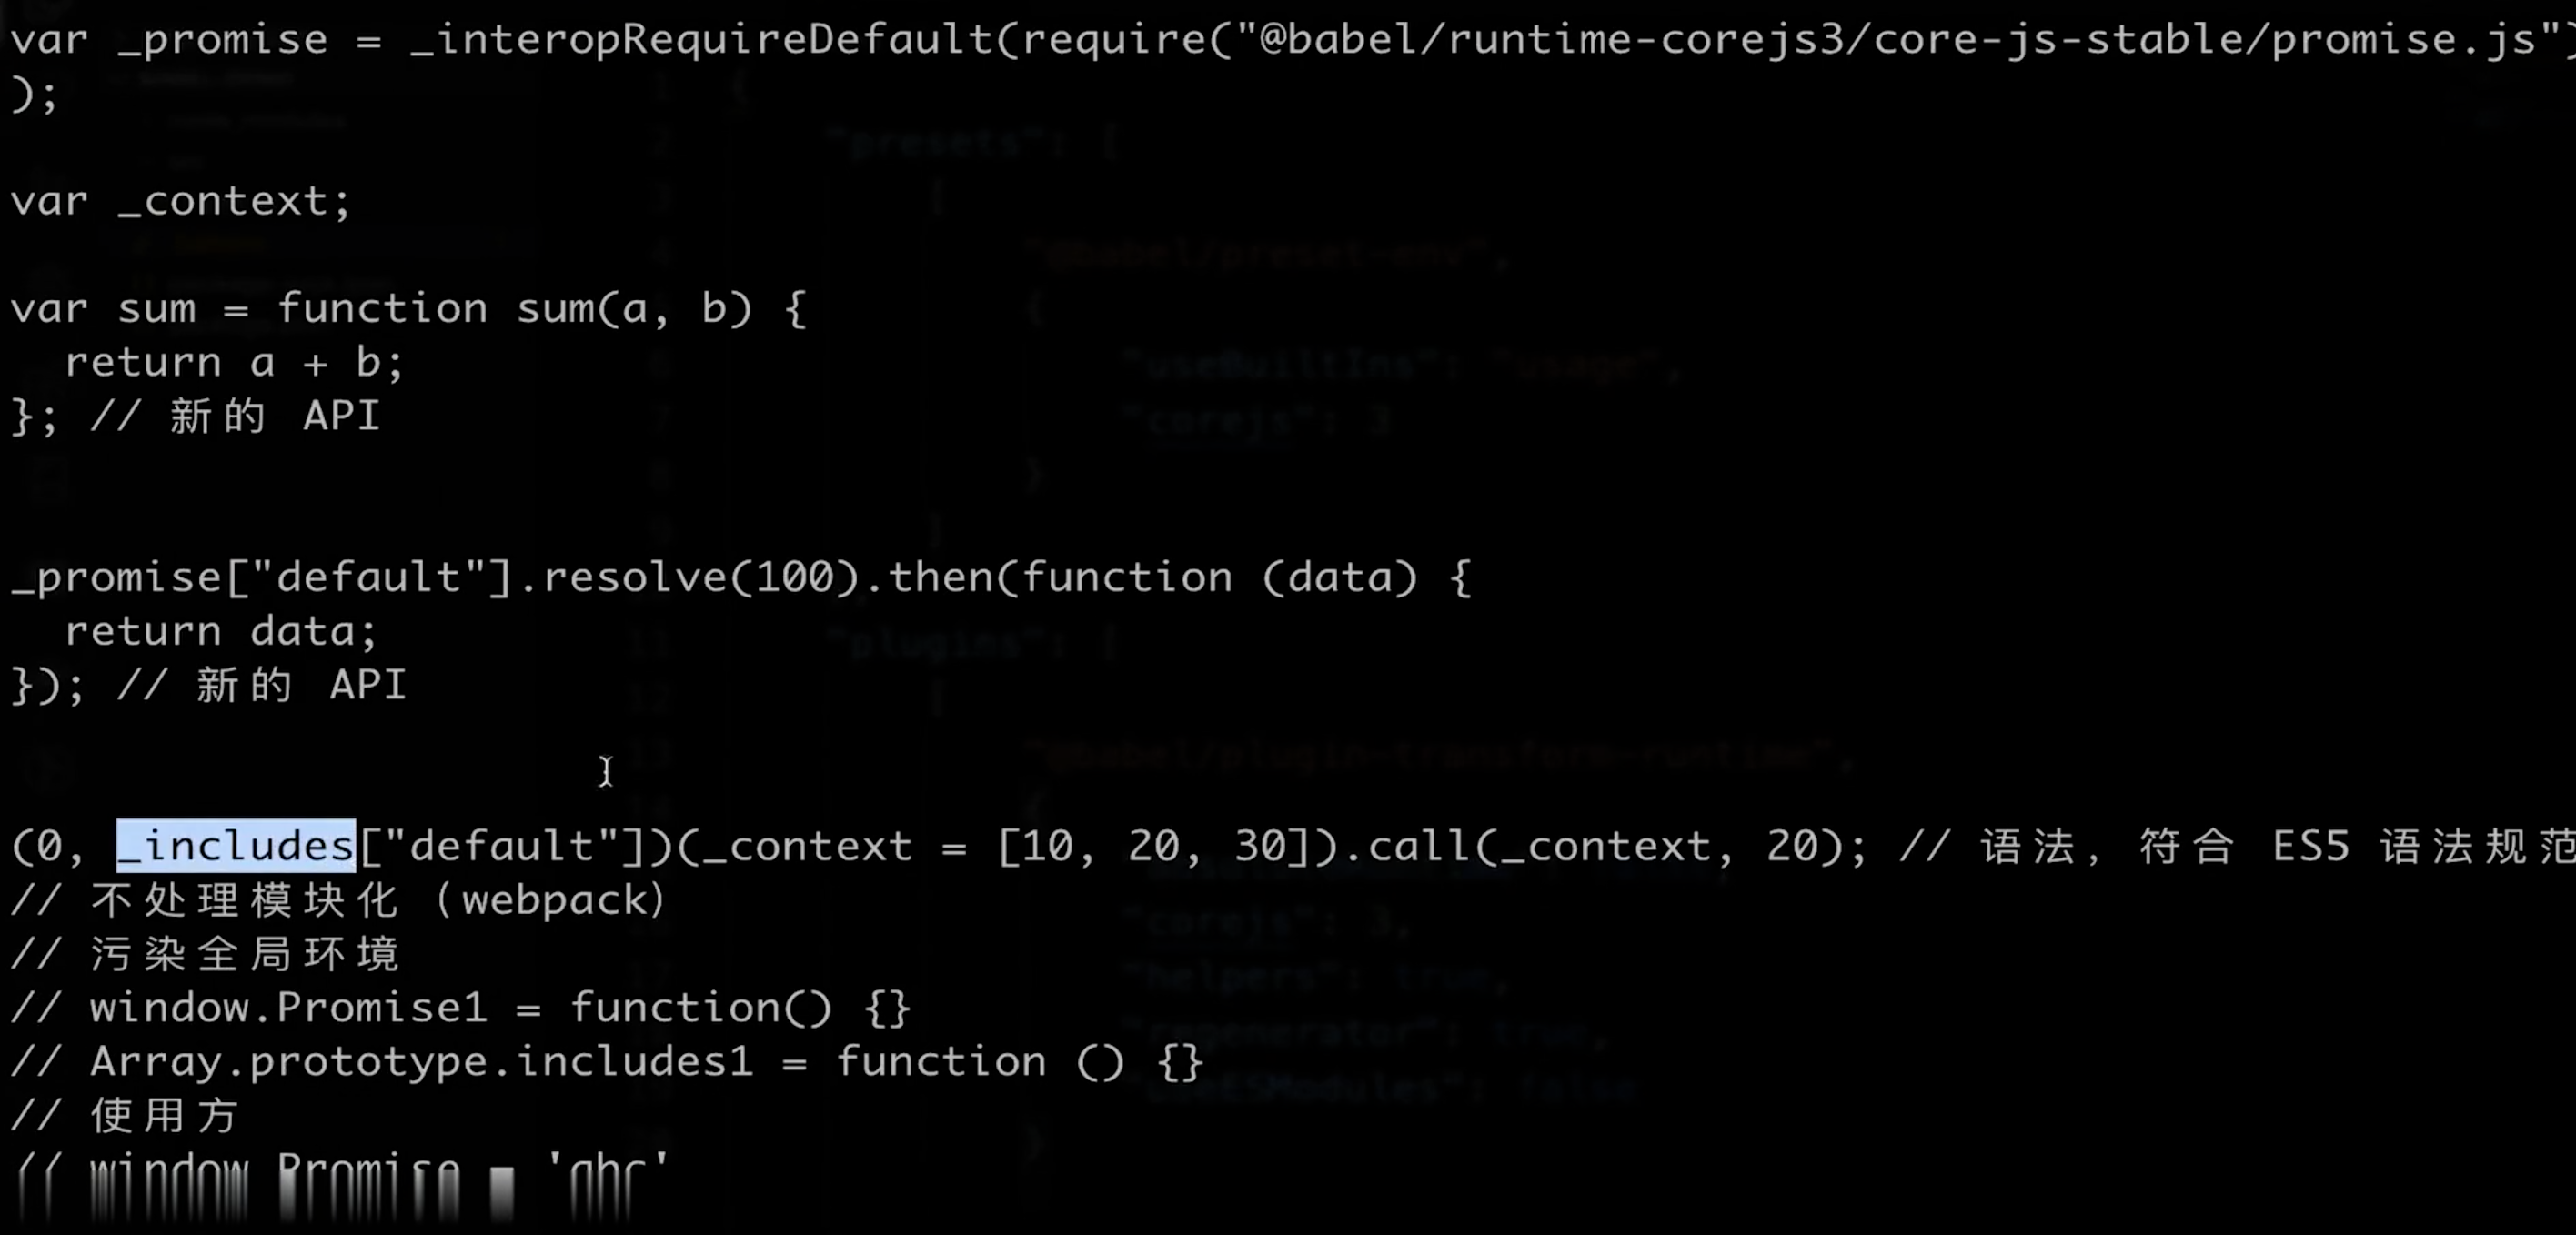
20 Babel Runtime
Babel Runtime是一个工具库,它包含了Babel编译过程中会用到的一些辅助函数,比如_extends、_classCallCheck等,这些函数在编译过程中会被插入到每个文件的头部,如果每个文件都插入一遍,会导致代码冗余,所以Babel Runtime就是用来解决这个问题的
    // .babelrc 配置runtime之后

    {
        "presets": [
            [
                "@babel/preset-env", // 一堆plugins的集合,包含常用的plugins
                {
                    "useBuiltIns": "usage", // 按需引入babel-polyfill
                    "corejs": 3 // corejs版本3
                }
            ]
        ],
        "plugins": [
            [
                "@babel/plugin-transform-runtime",
                {
                    "absoluteRuntime": false,
                    "corejs": 3,
                    "helpers": true,
                    "regenerator": true,
                    "useESModules": false
                }
            ]
        ]
    }
重新打包后,没有污染window
21 Tree Shaking原理是什么
对tree-shaking的了解
作用:
它表示在打包的时候会去除一些无用的代码
原理 :
ES6的模块引入是静态分析的,所以在编译时能正确判断到底加载了哪些模块- 分析程序流,判断哪些变量未被使用、引用,进而删除此代码
特点:
- 在生产模式下它是默认开启的,但是由于经过
babel编译全部模块被封装成IIFE,它存在副作用无法被tree-shaking掉 - 可以在
package.json中配置sideEffects来指定哪些文件是有副作用的。它有两种值,一个是布尔类型,如果是false则表示所有文件都没有副作用;如果是一个数组的话,数组里的文件路径表示改文件有副作用 rollup和webpack中对tree-shaking的层度不同,例如对babel转译后的class,如果babel的转译是宽松模式下的话(也就是loose为true),webpack依旧会认为它有副作用不会tree-shaking掉,而rollup会。这是因为rollup有程序流分析的功能,可以更好的判断代码是否真正会产生副作用。
原理
ES6 Module引入进行静态分析,故而编译的时候正确判断到底加载了那些模块- 静态分析程序流,判断那些模块和变量未被使用或者引用,进而删除对应代码
依赖于
import/export
通过导入所有的包后再进行条件获取。如下:
    import foo from "foo";
    import bar from "bar";

    if(condition) {
        // foo.xxxx
    } else {
        // bar.xxx
    }
ES6的import语法完美可以使用tree shaking,因为可以在代码不运行的情况下就能分析出不需要的代码
CommonJS的动态特性模块意味着tree shaking不适用 。因为它是不可能确定哪些模块实际运行之前是需要的或者是不需要的。在ES6中,进入了完全静态的导入语法:import。这也意味着下面的导入是不可行的:
    // 不可行,ES6 的import是完全静态的
    if(condition) {
        myDynamicModule = require("foo");
    } else {
        myDynamicModule = require("bar");
    }
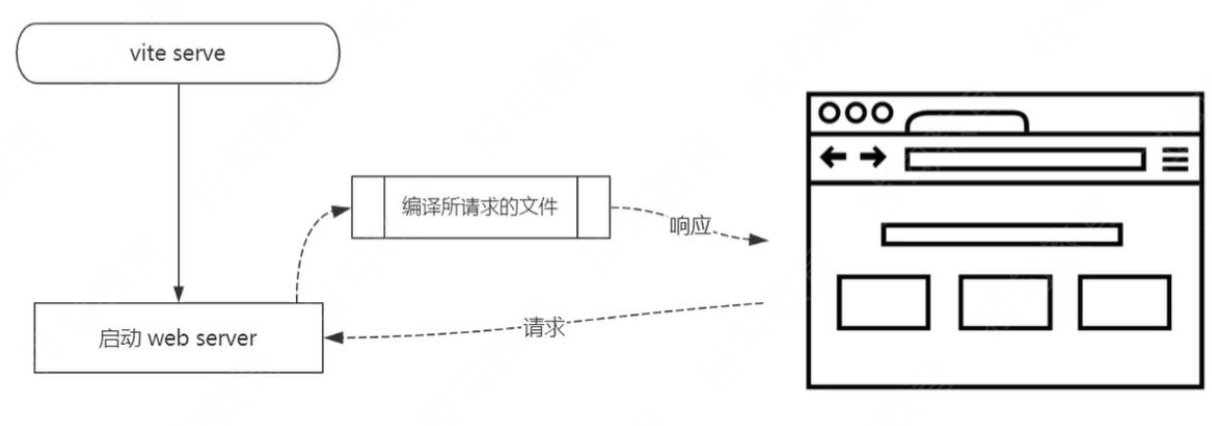
22 Vite了解吗
是一个基于浏览器原生
ES模块导入的开发服务器,在开发环境下,利用浏览器去解析import,在服务器端按需编译返回,完全跳过了打包这个概念,服务器随启随用。同时不仅对Vue文件提供了支持,还支持热更新,而且热更新的速度不会随着模块增多而变慢。在生产环境下使用Rollup打包
Vite 特点
Dev Server无需等待,即时启动;- 几乎实时的模块热更新;
- 所需文件按需编译,避免编译用不到的文件;
- 开箱即用,避免各种
Loader和Plugin的配置;
开箱即用
TypeScript- 内置支持less/sass/stylus/postcss- 内置支持(需要单独安装所对应的编译器)
生产环境需要打包吗
可以不打包,需要启动server,需要浏览器支持
Vite 为什么启动非常快
- 开发环境使用
Es6 Module,无需打包,非常快 - 生产环境使用
rollup,并不会快很多
ES Module 在浏览器中的应用
    <p>基本演示</p>
    <script type="module">
        import add from './src/add.js'

        const res = add(1, 2)
        console.log('add res', res)
    </script>
    <script type="module">
        import { add, multi } from './src/math.js'
        console.log('add res', add(10, 20))
        console.log('multi res', multi(10, 20))
    </script>
    <p>外链引用</p>
    <script type="module" src="./src/index.js"></script>
    <p>远程引用</p>
    <script type="module">
        import { createStore } from 'https://unpkg.com/redux@latest/es/redux.mjs' // es module规范mjs
        console.log('createStore', createStore)
    </script>
    <p>动态引入</p>
    <button id="btn1">load1</button>
    <button id="btn2">load2</button>

    <script type="module">
        document.getElementById('btn1').addEventListener('click', async () => {
            const add = await import('./src/add.js')
            const res = add.default(1, 2)
            console.log('add res', res)
        })
        document.getElementById('btn2').addEventListener('click', async () => {
            const { add, multi } = await import('./src/math.js')
            console.log('add res', add(10, 20))
            console.log('multi res', multi(10, 20))
        })
    </script>
手写实现
Vite 的核心功能:
Static Server + Compile + HMR
核心思路:
- 将当前项目目录作为静态文件服务器的根目录
- 拦截部分文件请求
- 处理代码中
import node_modules中的模块 - 处理
vue单文件组件(SFC)的编译
- 处理代码中
- 通过
WebSocket实现HMR
    #!/usr/bin/env node

    const path = require('path')
    const { Readable } = require('stream')
    const Koa = require('koa')
    const send = require('koa-send')
    const compilerSfc = require('@vue/compiler-sfc')

    const cwd = process.cwd()

    const streamToString = stream =>
      new Promise((resolve, reject) => {
        const chunks = []
        stream.on('data', chunk => chunks.push(chunk))
        stream.on('end', () => resolve(Buffer.concat(chunks).toString('utf8')))
        stream.on('error', reject)
      })

    const app = new Koa()

    // 重写请求路径,/@modules/xxx => /node_modules/
    app.use(async (ctx, next) => {
      if (ctx.path.startsWith('/@modules/')) {
        const moduleName = ctx.path.substr(10) // => vue
        const modulePkg = require(path.join(cwd, 'node_modules', moduleName, 'package.json'))
        ctx.path = path.join('/node_modules', moduleName, modulePkg.module)
      }
      await next()
    })

    // 根据请求路径得到相应文件 /index.html
    app.use(async (ctx, next) => {
      // ctx.path // http://localhost:3080/
      // ctx.body = 'my-vite'
      await send(ctx, ctx.path, { root: cwd, index: 'index.html' }) // 有可能还需要额外处理相应结果
      await next()
    })

    // .vue 文件请求的处理,即时编译
    app.use(async (ctx, next) => {
      if (ctx.path.endsWith('.vue')) {
        const contents = await streamToString(ctx.body)
        const { descriptor } = compilerSfc.parse(contents)
        let code

        if (ctx.query.type === undefined) {
          code = descriptor.script.content
          code = code.replace(/export\s+default\s+/, 'const __script = ')
          code += `
      import { render as __render } from "${ctx.path}?type=template"
      __script.render = __render
      export default __script`
          // console.log(code)
          ctx.type = 'application/javascript'
          ctx.body = Readable.from(Buffer.from(code))
        } else if (ctx.query.type === 'template') {
          const templateRender = compilerSfc.compileTemplate({
            source: descriptor.template.content
          })
          code = templateRender.code
        }

        ctx.type = 'application/javascript'
        ctx.body = Readable.from(Buffer.from(code))
      }
      await next()
    })

    // 替换代码中特殊位置
    app.use(async (ctx, next) => {
      if (ctx.type === 'application/javascript') {
        const contents = await streamToString(ctx.body)
        ctx.body = contents
          .replace(/(from\s+['"])(?![\.\/])/g, '$1/@modules/')
          .replace(/process\.env\.NODE_ENV/g, '"production"')
      }
    })

    app.listen(3080)

    console.log('Server running @ http://localhost:3080')
23 面试真题
前端为何打包和构建
- 体积更小 (
Tree Shaking、压缩、合并)加载更快 - 编译高级语言语法 (
TS、ES6+、模块化、SCSS) - 兼容性和错误检查 (
polyfill、postcss、eslint) - 统一高效的开发环境
- 统一的构建流程和产出标准
- 集成公司构建规范(提测、上线等)
module chunk bundle区别
moudle各个源码文件,webpack中一切皆模块chunk多模块合并成的,如entry中定义的、import()动态导入的、splitChunks拆分的bundle最终输出的文件
loader和plugin区别
- loader模块转化
scss=>css - plugin插件 ,扩展功能,如
html-webpack-plugin、clean-webpack-plugin
babel和webpack的区别
babelJS新语法编译工具,不关系模块化webpack模块化打包工具,是多个loader、plugin的集合`
babel-polyfill和babel-runtime的区别
babel-polyfill污染全局变量,会影响其他库babel-runtime不会污染全局变量,不会影响其他库- 产出第三方
lib要用babel-runtime
webpack如何实现懒加载
import()语法- 结合
vue、react异步组件 - 结合
vue-router、react-router异步加载路由
为何proxy不能被polyfill
- 如
Class可以用funcition模拟 - 如
Promise可以用callback模拟 - 但
Proxy的功能用Object.defineProperty无法模拟
webpack优化
优化构建速度
可用于生产
- 优化
babel-loader IgnorePluginnoParseHappyPackParallelUglifyPlugin
不用于生产环境
- 自动刷新
- 热更新
DllPlugin
优化产出代码
- 小图片转
base64 bundle加hash- 懒加载
import() - 提取公共代码
splitChunks - 使用
CDN加速 IgnorePlugin- 使用
production模式 Scope Hoisting是webpack3引入的一个新特性,它会分析出模块之间的依赖关系,尽可能地把打散的模块合并到一个函数中去,减少代码间的引用,从而减少代码体积
阅读全文